You can trust VideoGamer. Our team of gaming experts spend hours testing and reviewing the latest games, to ensure you're reading the most comprehensive guide possible. Rest assured, all imagery and advice is unique and original. Check out how we test and review games here
- Basic road network
- Logging Camp (1 assigned family)
- Granary (1 assigned family)
- Storehouse (1 assigned family)
- 5 Burgage Plots
- Marketplace
- 3 Chicken Coop Burgage Plot extensions
- Well
- Woodcutter’s Lodge (1 assigned family)
- 5 Burgage Plots
- Forager’s Hut (1 assigned family)
- Hunting Camp (1 assigned family)
- Sawpit (1 assigned family)
- Upgrade the Hitching Post to a Small Stable and hire a second ox
- Upgrade the Storehouse to a Large Storehouse
- Trading Post (1 assigned family)
- 3 Chicken Coop Burgage Plot extensions
- 4 Vegetable Garden Burgage Plot extensions
Zooming into your freshly spawned settlement for the first time in Manor Lords can be overwhelming. There’s not much in the way of a tutorial and you’re left to wade through the confusion by yourself. Juggling growing your settlement and meeting the needs of your settlers can feel a bit like throwing everything at the wall and seeing what sticks as you try to figure out a starting build order in Manor Lords.
But while experimentation is a lot of fun in Manor Lords, devising a solid build order can help make sense of those early hours, ward off the early demise of your settlement, and help you learn the ins and outs of the game. In that spirit, we’ve pieced together the best Manor Lords build order for the early game. Our main aim here is to help you survive the first year, avoid the most common pitfalls and issues, and give you some flexibility in how you shape your settlement moving forward.

Manor Lords early game build order
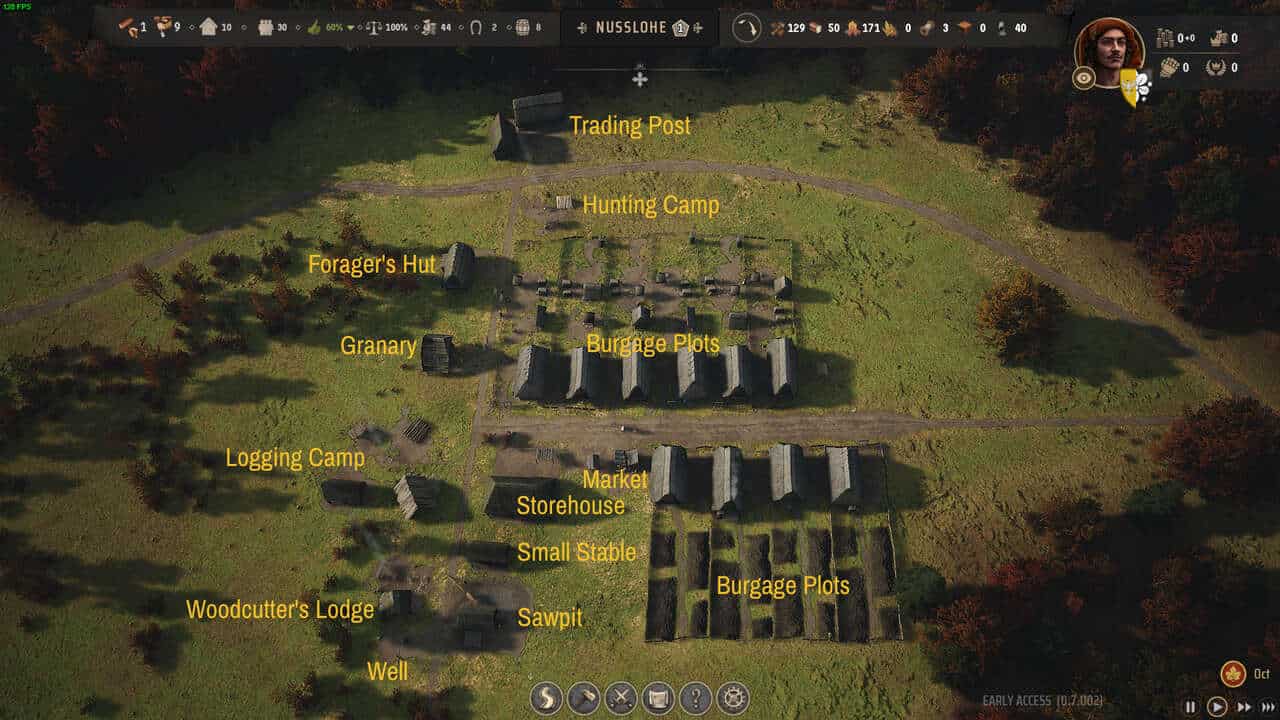
There are three main aims when starting a fresh save: house all your settlers to eradicate homelessness, get all your starting supplies and resources under cover, and gather timber, fuel, and food. The overall goal is to build a balanced settlement that can sustain itself while expanding slowly through to the coming winter.
As soon as you load it, pause the game and construct these buildings in the order that follows:
- Basic road network
- Logging Camp (1 assigned family)
- Granary (1 assigned family)
- Storehouse (1 assigned family)
- 5 Burgage Plots
- Marketplace
- 3 Chicken Coop Burgage Plot extensions
After laying down a basic road network, start off with a Logging Camp and assign a family to gather Timber, which you’ll need to construct buildings, then immediately place down a Granary and Storehouse then assign a family to each. After they are built, your villagers will ferry over all the exposed goods and supplies to get them undercover, preventing damage from the elements, notably rain. This leaves you three unassigned families to quickly build the 5 Burgage Plots that will house your starting families, getting rid of the homelessness Approval penalty, and removing the homeless tents. This should also push your Approval above 50% to start attracting new settlers.
A marketplace will ensure your burgage plots are supplied with food and fuel. Place it as close to the starting Burgage Plots as possible to reduce travel time. Lastly, you’ll want to spend a good portion of your starting allocation of Regional Wealth on 3 Chicken Coop burgage plot extensions (x25 Regional Wealth each). Eggs are harvested throughout the year unlike vegetables, which are seasonal, so they’re a better way to get a steady source of food in the early game. Once all that is set up and Timber is coming in, it’s time to construct the next batch of buildings in this Manor Lords build order, as follows:
- Well
- Woodcutter’s Lodge (1 assigned family)
- 5 Burgage Plots
- Forager’s Hut (1 assigned family)
- Hunting Camp (1 assigned family)
- Sawpit (1 assigned family)
- Upgrade the Hitching Post to a Small Stable and hire a second ox
- Upgrade the Storehouse to a Large Storehouse
- Trading Post (1 assigned family)
- 3 Chicken Coop Burgage Plot extensions
- 4 Vegetable Garden Burgage Plot extensions
Building a Well will meet your Burgage Plots’ water access amenity requirement. Next, build a Woodcutter’s Lodge and assign a family there to start gathering firewood. Once you’ve amassed enough Timber, lay down a further 5 Burgage Plots and wait for new settlers to move in. Build a Forager’s Hut and assign a family to start gathering Berries, then a Hunting Camp with a family assigned to gather Meat, giving you two extra sources of food to stockpile alongside Eggs from the Chicken Coop extensions. Whenever you can, assign a second family to the Hunting Lodge to gather more Hides, which we’ll use for trading.

A Sawpit comes next to start converting excess Timber into Planks. We’ll soon use any surplus to start trading and building up Regional Wealth. Remember to assign a family to the Sawpit. Once the first Planks start coming out, upgrade the Hitching Post to a Small Stable to gain an extra Stable Space then hire a second ox. The ox will drastically speed up construction, especially of those 5 extra Burgage Plots. At this point, it’s also worth upgrading the Storehouse to a Large Storehouse to stockpile more resources.
Next, it’s time to build a Trading Post and assign a family. Once built, set both Hides and Planks to export with a small surplus to make sure you can keep some for future construction and Leather production. Once you start gaining Regional Wealth, steadily upgrade your Burgage Plot extensions so that you have 3 extra Chicken Coops (6 in total) and 4 Vegetable Gardens. With these, you’ll have four sources of food and should start building up quite a few months of supplies ahead of winter.
Beyond the first Winter
Follow the Manor Lords build order above and you’ll have a solid foundation for your settlement. From here, it’s really up to you in what direction you go, but I recommend building farms and fields to grow wheat at the start of the second year. Remember to build a Windmill and Communal Oven to make bread after the first harvest.
A Church should come soon after as well to meet the Church Level requirement. More Burgage Plots will help you get the new families needed to assign more workers to your existing buildings. Prioritise the Granary and Storehouse when you can as extra workers will cut down on logistical bottlenecks and make sure goods and foods flow smoothly from production buildings to your market stalls.

A Tannery is also a solid move at this point, as it allows you to convert Hides gathered from the Hunting Camp into Leather to meet the Clothing Stall Supply requirement of your Burgage Plots. You’ll also have a Development Point to spend, which I recommend using on the Heavy Plow upgrade to greatly increase the efficiency of farming. Check our best developments guide for more on that. Once you’ve completed your first harvest, don’t forget to build a Windmill and Communal Oven to start producing Bread.


