You can trust VideoGamer. Our team of gaming experts spend hours testing and reviewing the latest games, to ensure you're reading the most comprehensive guide possible. Rest assured, all imagery and advice is unique and original. Check out how we test and review games here
Huntsman’s Copse is a relatively easy area, especially for melee characters with the Fire Longsword. There are loads of skeletons in this area, with the final boss also being a barrage of the skinny minions, so any fire spells or weapons at your disposal are a must.
Getting to Huntsman’s Copse
From Majula, Head towards Heide’s Tower of Flame. In the room with the central pillar with the white lock in the centre, you’ll meet Licia of Lindeldt, whom you originally ran into after defeating the Dragonrider. For 2000 souls, Licia will unlock the second path out of this room, leading towards Huntsman’s Copse.
Proceed out the second exit and grab the Rouge Water. Follow the cave round, hugging the left hand wall to avoid falling off the edge. At the end of the cave you’ll run into Felkin the Outcast sat in a red chair, facing the wall. Only players with a certain level of Faith and Intelligence will be able to engage him in conversation, otherwise he’ll simply ask you to leave him alone.
Head out of the cave and to the left will be the first Huntsman’s Copse bonfire.
Huntsman’s Copse
Head towards the second cave, left of the entrance will be a sitting zombie, kill him before he gets up. Kill the zombies as you walk in and you’ll see a narrow walkway, sprint across as there’s a butterfly above that secretes poison.
Exit the cave and head up the stairs. There are two thieves in this room, one of which is an archer, so open the door and back out to avoid his fire, taking out the knife-wielding thief that follows. These thieves have quick combos but are easy to kill, just keep your guard up until they’re done attacking.
Archer’s arrows inflict poison damage, so try and keep your shield up until you’re close enough to attack. Head past the archer, open the door and turn left, walk past the ladder and follow the ledge, there’s an enemy waiting for you in ambush, but behind him is a Cracked Red Eye Orb.
Backtrack and take the ladder down, follow the building round and knock the tree down to give you a shortcut back to the first bonfire. There’s a hole in this building with the second bonfire inside.
To the right of this second bonfire is a large forest, it’s very hard to get your bearings in this area, so it’s best to just be aware of what is inside with a few pointers:
- To the left of the bonfire is a small footbridge with a torch-wielding zombie on it. There’s also a zombie to the right, and a thief leaning against a tree to the far left before the bridge, near the precipice. The left-hand path leads to an eventual dead-end, but there are some sickle-wielding enemies which are incredibly powerful. It requires near-perfect timing to roll away from their attacks and backstab, but as you’re so close to the bonfire, this is a good place to practice. There are three sickle wielding zombies in total.
- Over this footbridge again, the southwest corner houses another poison-secreting butterfly in one of the trees. There’s also a bunch of zombies in this part of the forest. Try to deal with the sickle guys before coming to this corner.
- Don’t head over the smaller footbridge (located to the right of the hill leading to the drawbridge, next to the lump of fallen tree), it leads to an ambush with a bunch of incredibly powerful mace-wielding zombies which are even more dangerous than the sickle guys. You’ll more than likely die and you can get to the boss of this area without touching this part of Huntsman’s Copse.
- Here’s a list of all the confirmed items in the forest:- Morning Star- Aromatic ooze- Poison moss- Green blossom- Soul SpearSome of these will be in huts, others lying around on the floor, often guarded by enemies.
- To the right of the bonfire is a hill leading to a drawbridge, you need to lower the drawbridge to get to the next area and boss. To lower the drawbridge, backtrack along the far wall into a hut which has a lever, there’s a thief lying in ambush inside, so it’s best to walk in, backstep and then pull it.
- As you head up the hill towards the drawbridge, you’ll come across a couple of zombies, thieves, an archer and a mace-wielding enemy similar to the sickle fighters on the opposite side, except this guy is faster. Try to walk slowly over the bridge to trigger the easier enemies and not the mace guy.
- To the right of the drawbridge is a ledge where you can drop down into a hole in a roof of a hut and grab a bunch of items.
Once the drawbridge is lowered, head across and turn left. There’s a bonfire behind a locked gate, you’ll soon have the key. Head into the cave next to the bonfire, you’ll come across some skeletons. These guys are weak to fire and melee, so the Fire Longsword is a real asset from here on. The skeletons will continue to respawn until you kill the skeleton witch doctor found further in the cave. Use a torch here if you’re having trouble finding the way, the skeleton’s attacks are pretty slow and you can kill them in just a few hits.
You’ll reach a gate that you can’t open yet, turn around and there’s another exit from this cave to the right, leading to a wooden bridge. A thief will attack you immediately, once he’s dead, head right. You’ll be invaded by Dark Spirit Roenna, who wields a scythe. Be careful to not overdo counters, as it’s very easy to fall off the cliff. Once Roenna is down, grab the key from inside the hut.
Before proceeding any further, it’s best to backtrack and gain access to that bonfire first. To do this, backtrack and head along the path. The first path to the right leads to an ambush from a bunch of thieves, so you can choose to ignore it. Keep following the path around and you’ll eventually be back at the main entrance to the cave, use the key and rest at the bonfire. The skeletons will respawn in the cave, but the witch doctor won’t, so when you kill them, they’ll stay down.
Head back through the cave, across the bridge and turn right. Head behind the waterfall, the fog will be on your left which leads to the boss, the Skeleton Lords, but for now, head past the fog and continue along the ledge. There’s another cave on the left with respawning skeletons and a witch doctor, ahead of them is the gate which will give you a much quicker journey back to the boss. The witch doctor is on a small ledge that melee characters will have to jump across to in order to kill it.
Once you’ve opened up the shortcut, head back through the fog to face the Skeleton Lords.
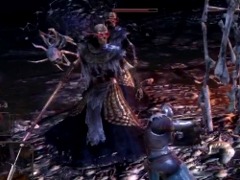
How to beat the Skeleton Lords
The Skeleton Lords fight starts with three giant skeletons, two melee and one fire mage. As is the case with all skeletons, they’re weak to fire and melee. Run straight ahead as you go through the fog and take out the mage as he falls down from the pillar. You should be able to quickly deal with these three before the pinwheel skeletons and other sword fighters spawn.
The pinwheel skeletons can be a real handful, as they attack from every direction and can knock you down. Your best bet is to stick to one of the two pillars in the room, as the Pinwheels find it hard to attack you when hid behind these. They don’t take many hits to go down, so just keep plugging away and they’ll begin to fall. Backstepping is also a key tactic to dodging their rolls.
This fight is frustrating, but can be done in just a few attempts. Once the fight is over, head out the door, lower the drawbridge and proceed through to the Harvest Valley, walk through the poison swamp to the left and rest at the bonfire.
About the Author