You can trust VideoGamer. Our team of gaming experts spend hours testing and reviewing the latest games, to ensure you're reading the most comprehensive guide possible. Rest assured, all imagery and advice is unique and original. Check out how we test and review games here
Call of Duty Modern Warfare 2 is Infinity Ward’s next installment in the Modern Warfare Remake Series and the title did pretty well with its Open Beta window, garnering a total of 170,000 concurrent players online on just PC. The Open Beta has finally concluded, with its short run time of 2 days from 24 September to 26 September 2022. Due to popular demand, the developer extended the Open Beta for another 2 hours and it officially ended on 26 September 2022, at 8 PM BST.
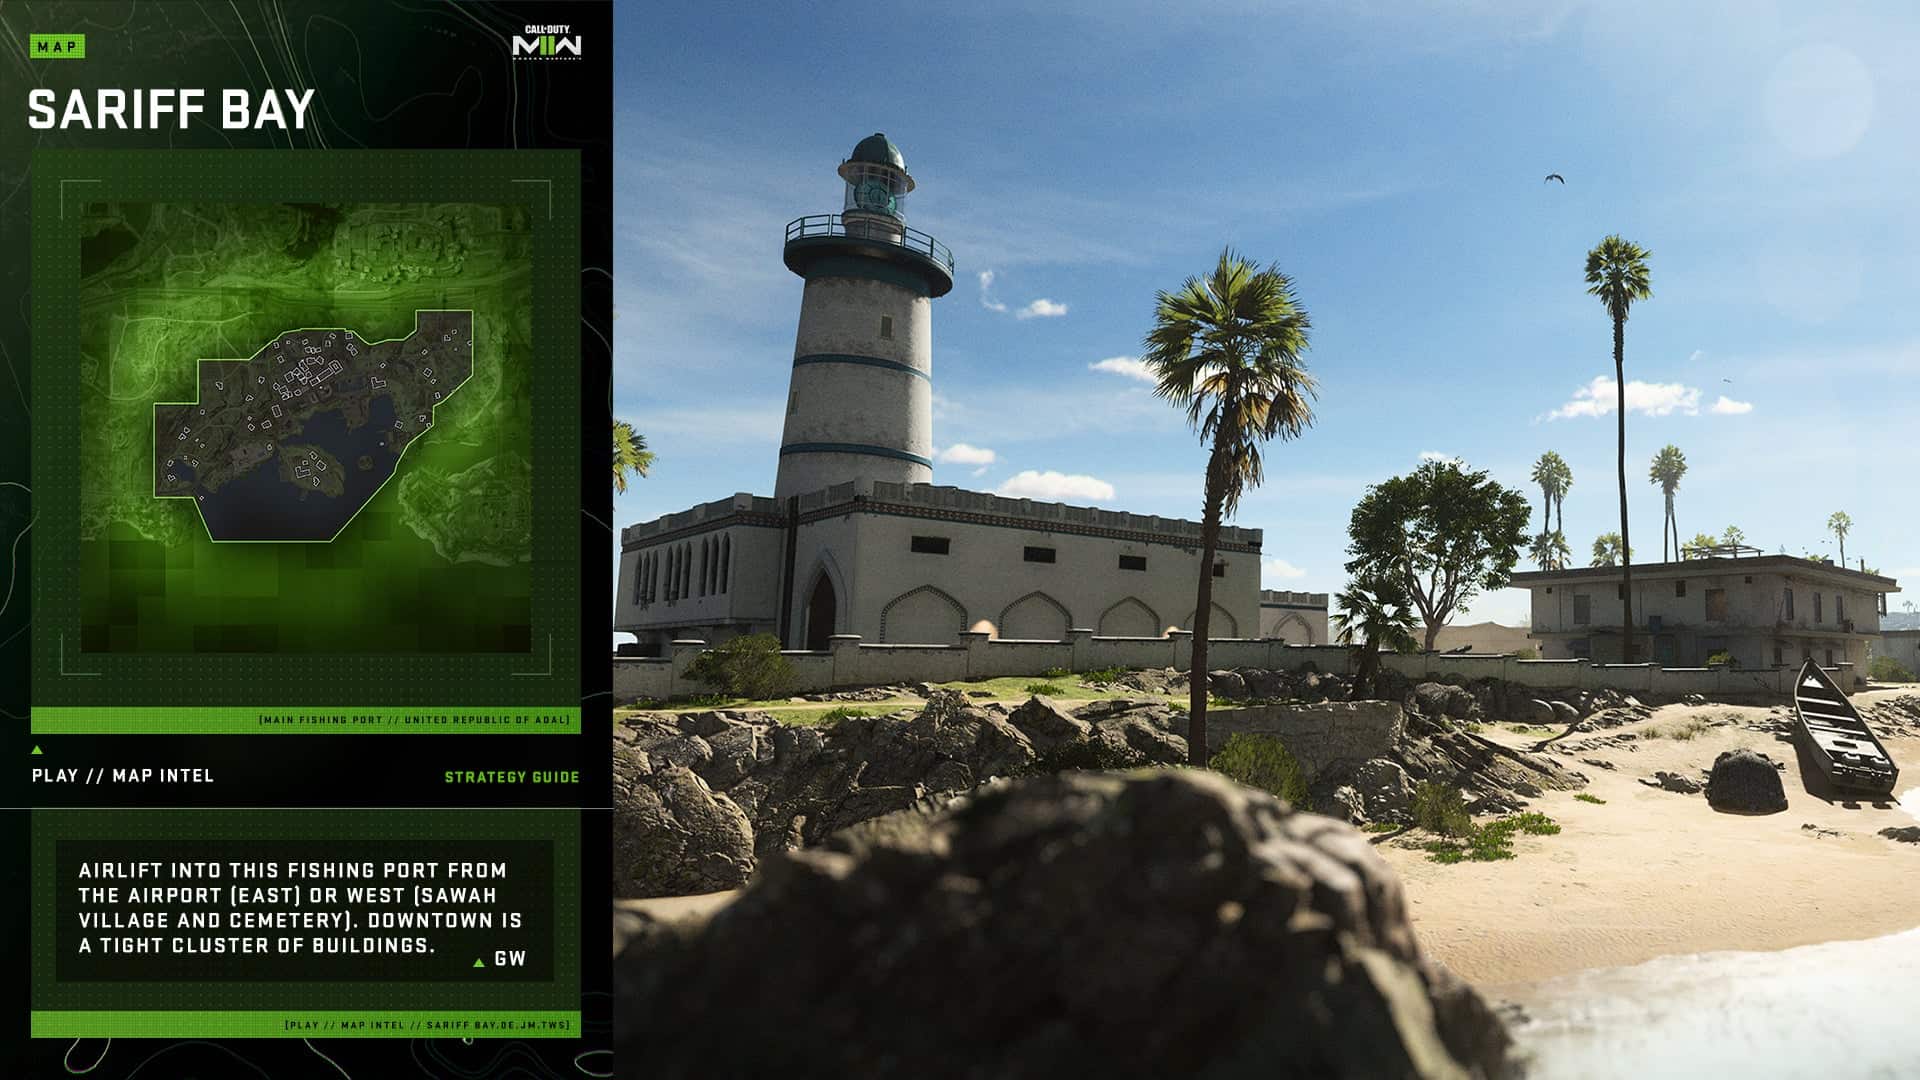
We got to enjoy a handsome addition of 6v6 core Multiplayer Maps for the open beta in addition to the two ground war maps consisting of Sa’id and Sariff Bay. Today we’ll be taking an in-depth look at the opportunities and positions you can exploit when heading into Ground War on the grounds of Sariff Bay.
Sariff Bay Overview
Sariff Bay is one of the Points of Interest that will be featured in the upcoming Warzone 2.0 Battle Royale Title. Players got to enjoy an exclusive look at the upcoming section of Warzone 2.0’s map in Call of Duty Modern Warfare 2’s Ground War Multiplayer Mode.
Sariff Bay stands on the Southern Shore of the Republic of Adal. The Bay was a source of valuable fishing opportunities used to fuel the country’s economy. In contrast to the modernized East Shore and Hafid Port, Sariff Bay was a landmark and extension of Adal’s history in conjunction with the adjacent Al Barga Fortress.
Sariff Bay was once home to fishers who had their homes passed down through generations but they soon witnessed the urbanization of the Bay as a new small town along with apartment complexes popped up.
But there’s no sign of the local fishers or the urbanization of Sariff Bay and Adal anymore as Sariff Bay has been turned into a warzone for KorTac and SpecGru operators.
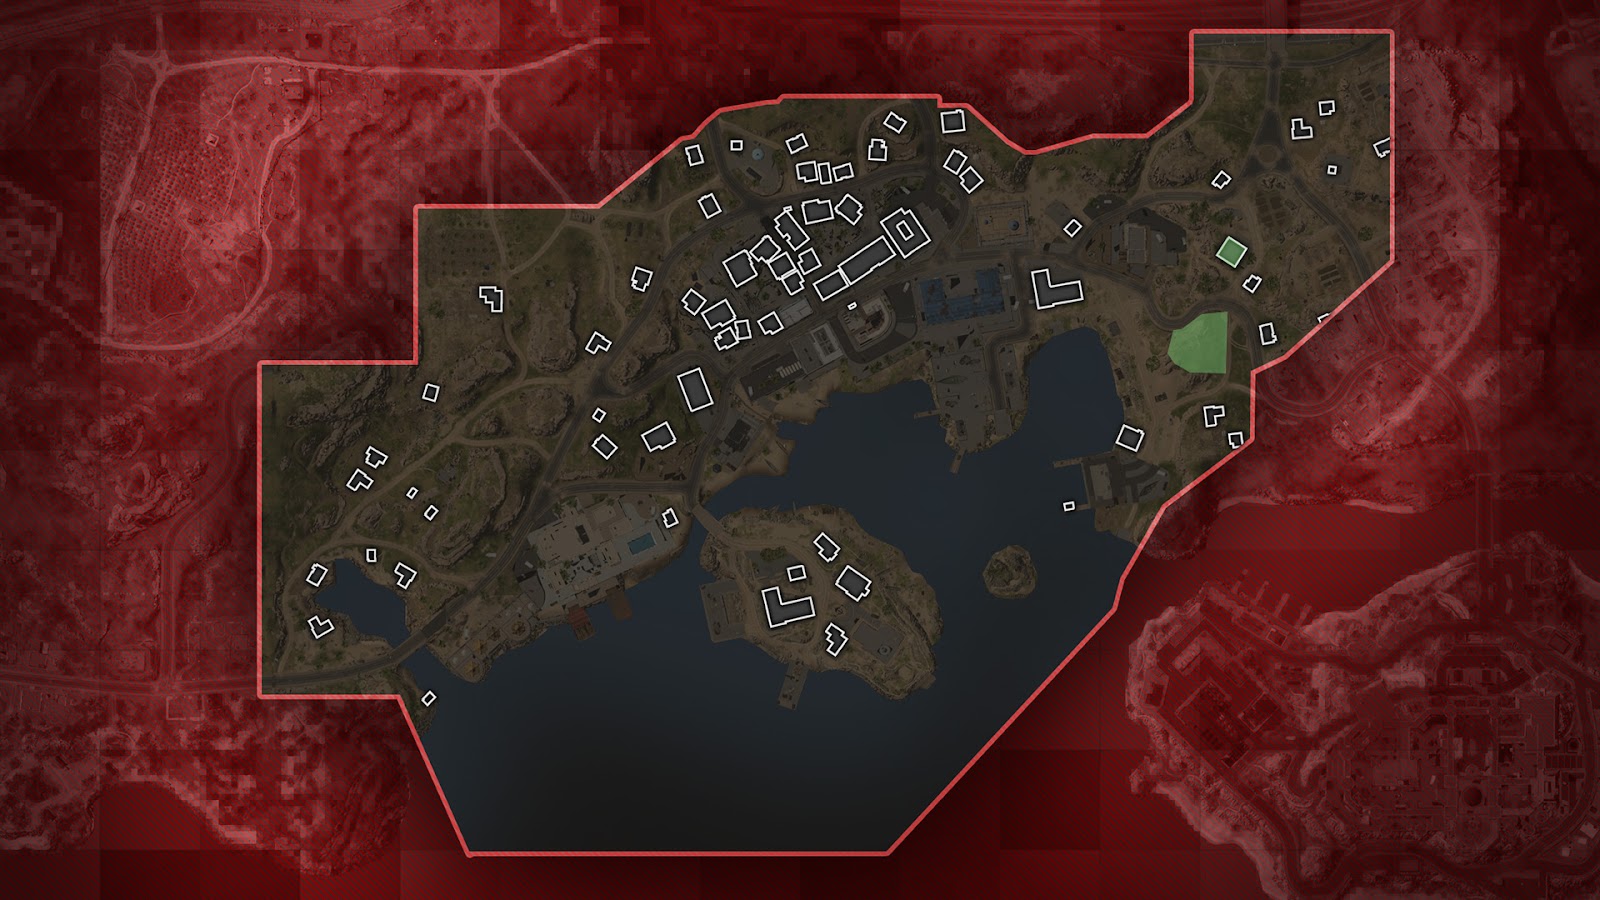
One thing to note here is that Infinity Ward hasn’t designated any specific names to the areas located in Sariff Bay so it’s been split into 10 zones in accordance with the Ground War flag spawn locations.
Headquarters
SpecGru Headquarters
- You could potentially explore the greater parts of the Sariff Bay in Ground War Mode, but if you decide to stay behind, then your best bet would be to navigate your way to the bike shop or the raised fields which provide a decent oversight on the D Flag Docks and the E Flag Apartment.
- SpecGru operators make their way to the headquarters via airlift and enjoy opportunities to rotate from the adjacent Fortress and Airport. This aspect of the bay contains the following areas:
- At the back of the zone, you’ll notice a bridge that heads straight to Ahkdar but it’s inaccessible in Ground War and will soon be accessible in Call of Duty Warzone 2.0. You’ll also come across a few suburbs as well in this area. On higher ground, you’ll find a walled-off estate that oversees these two points.
- Players will spot another walled-off structure. This time, it’s a simplified piece of architecture featuring two buildings consisting of a set of stairs towards the back. These stairs lead to an orange communications tower that will be mentioned in the later parts of the guide.
- Right in front of this structure, you’ll find yourselves at a small roundabout. Additionally, you’ll find a field that is used for military supplies. Continue Southeast from the roundabout to find yourselves at the raised fields and homes that head towards the D Flag Dock.
- Players can also head through the roundabout to the E Flag Apartment which directs you to a square-ish Bike Shop. The Bike Shop features an accessible roof with a spacious balcony on the second floor.
- The raised fields as well as the bike shop provide great sightlines toward the nearby Ground War Flags. This allows a great opportunity for long-range weapons experts to obtain some kills while clearing out and controlling the busier portions of Sariff Bay.
- Although these positions don’t provide you ample cover, you can solve this problem by using your handy deployable cover, The natural elevation provides you with the well-needed high ground to fend off these busier areas from a medium to long range distance.
KorTac Headquarters

- KorTac members gain the upper hand when it comes to speedy access to the bayfront via the inlet. KorTac operators can make it quickly to Flag B. Otherwise, it can also serve as a viable escape route when navigating to other sections of Adal later in Warzone 2.0.
- KorTac Headquarters are located opposite the command center of the SpecGru. Players gain easy access to the grassy cliffs behind where KorTac members are dropped off. These cliffs offer great lines of vision over the valleys. A guard tower is located below the cliffs that offer you a bit of cover from enemy fire. If enemy operators begin to pick you off on the cliffs, head to the guard tower for some solid protection and cover
- The small network of homes near the Ground War spawn point doesn’t offer much in this game mode. Otherwise, the arrangement of houses provides opportunities for cross-building sniping.
- The more interesting set of homes is the ones near the inlet. You can easily come across a boat near the contaminated pool in this location. To get to the actual Sariff Bay, take these boats and head right under the bridge. This offers players a solid strategy to get a quick jump on Flag B found on the Island. This strategy could very well allow players to quickly rotate from objectives in Ground War or use it as an escape route in other game modes.
- The outlet that leads into the bay features a collection of party tents on its shore. These can serve as good cover locations when making a move on the A Flag resort or making a rush or the B Flag Island.
Map Strats
Considering most of the areas in the Sariff Bay are unnamed, we’ve gone ahead and broken them down into their general locations based on their flag-based Ground War Mode to keep things easier to understand. To be fair, all these strategies can work for other upcoming game modes for Call of Duty Modern Warfare 2 and Warzone 2.0.
A Flag Resort

- There are many optional ways to invade and take control of the interior Resort Area where you’ll come across the A Flag. You can make your way by the billiards room or the hookah parlor, take a ladder and make it to the complex’s roof and rain fire from above.
- The luxury resort was once a world-class destination offering amenities like private dining, commercial laundry services, a billiards hall, a pool, and a hookah lounge along with easy access to the nearby island.
- While it may offer a bit of protection from pesky long-range positioned snipers, it features many windows and doors. You also have to take into account the roof from which users can rain hellfire. It’s not an easy zone to capture especially if you’re operating alone, but it’s easier for KorTac operators.
- The Bay offers the best scenarios for KorTac operators to scale an invasion. The main roads are within the lines of vision for the KorTac HQ, which can be exploited in your best interests. Make your way through the roads and sneak through the billiards hall or the hookah parlor to get a taste of some close-quarter combat while moving toward the center.
- In addition, the outdoor walkways of the resort can set the stage for some mid-range gunplay. One such opportunity presents itself on the East Side where a ladder leads up to the roof. Make your way up there with a supporting teammate and enjoy the incredible view that offers numerous sightlines down to the Resort, offering you a surprise tactical edge over SpecGru operators.
- When you finally position yourself on the roof of the Resort, you can easily access any of the adjacent roofs which you can jump to. Just pull your parachute strings on time in case you miss the jump and prepare to regroup with your teammates.
B Flag Lighthouse Island

- If operators are taking control of the Lighthouse museum, make use of these three ladders to get on top of the building’s roof, which offers entry into the tower via a second door.
- A solitary bridge from the resort is the only way by land to gain entry into the Lighthouse Island where Flag B usually spawns in Ground War Mode. Next to it is the smaller island that consists of no bridges to the Lighthouse. This practically turns it into no man’s land for operators and boaters trying to make their way to land in these stormy conditions.
- The Lighthouse features an auxiliary museum for the nearby Al Barga Fortress with an unfunctional medieval cannon displayed in the center. This specific landmark is located within a semi-circular walled structure where B Flag normally spawns. The wall is pretty important in offering defense in what is an otherwise open space.
- The Lighthouse is the center of attention outside of patrolling other buildings and seeing where they fit into your strats. The ground floor museum of the Lighthouse is small enough to offer opportunities for close-quarter combat. Players can also lay out plenty of equipment on the spiral staircase with traps the likes of regular mines and cluster mines along with other pieces of equipment being thrown into the mix.
- Your journey up to the Lighthouse will indeed be tedious as it requires a trip up two flights of stairs and a small set of metal rungs. But the trouble is all worth it, as you gain access to full sightlines and oversight over the island, the Resort, and edges of the Al Barga Fortress, and the Central Dock.
- If you’re having problems making your way to the top due to enemies swarming the first floor, then you could take a trip around the exterior of the Lighthouse to come across some ladders that lead all the way up to a split-level roof. This offers a quick shortcut route via double doors to the landing between the two lighthouse staircases.
Downtown C Flag

- The Downtown section of the map lowers in altitude from North to South and tends to slope. This offers the best tactical position to snipers and provides ideal sniping locations to operators in this zone. Use these two advantages at your disposal for the best overwatch point overlooking the central street. Another ideal location for sniping is the tallest building in the Downtown area which is decent for general overwatch.
- The Downtown area provides an impressive collection of apartments and buildings with a street that runs straight down to the center and divides it into two equal sections. This street also leads down to the Central Docks too in case you were wondering.
- It’s pretty obvious that you can get a lot of close-quarter combat action in the multi-story buildings, but note that you can easily get lost in them if you get too immersed in the action. We recommend a healthy diet of CQB weaponry, sidearms, shotguns, and SMGs to make survival a possibility in some of the tightest hallways and room setups on the map.
- All the rooftops Downtown are pretty accessible, and allow users to engage in a bit of parkour fun while quickly making it across this section of the map and town. Take command of the inland buildings and exploit the North to South slope.
- But remember, this area will be swarming with snipers and mid-range weapon wielders by default, especially on the roofs. If you’re positioned on the streets below, be sure to occasionally pan your camera upwards to spot any enemy operators. The best method of dealing with rooftop snipers is to get right under their field of vision. Get right below them where they’ll have to make the next move from an uncomfortable angle.
The Downtown is surrounded by the Central Docks located in the South and the Downtown Outskirts in the North.
Central Docks

- You’ll find a Fire Station on the West side of the Docks which offers a great counter-sniping point against enemy snipers teeming on the rooftops of the Downtown area. In addition, you can exploit great sightlines to counter enemy long-range weapon wielders all the way across to the B Flag Island. A side benefit is that the Fire Station is by far the easiest to access from the rest of the Bay or the Docks.
- The southern shore has practically no objectives in Ground War Mode. It provides a pivotal place for taking control of other parts of the Republic of Adal and seafaring boaters and invaders. The area provides plenty of outlets to the Bay along with short navigation routes to the D Flag Docks and the B Flag Lighthouse Island.
- Let’s start from West to East. You’ll notice a collection of buildings consisting of a blue apartment complex, an appliances store, and a Fire Station. The Fire Station offers a tower that offers a wide view spanning over to the B Flag Island, the C Flag Downtown as well as other areas if you get the right angle. Considering how easy it is to access it from the Bay or the streets, this should be a must-stop destination when exploring this section of Adal in all game modes.
- Near the Fire Station, you’ll find a small creek. Move past it to find the Supermarket that consists of a substantial wrap-around balcony as well as a staircase leading up to its ventilation equipment. This location offers players a great oversight of the Bay, but it can also offer parkour opportunities to veteran gamers. You can jump down to a nearby balcony and begin traversing Downtown without ever needing to access the streets below.
- Adjacent to the Supermarket, you’ll find a Restaurant. Though it may not have any parkour routes for you to enjoy, it offers some immense sightlines to the Eastern part of this zone. The Supermarket and the Restaurant allow users to engage in some solid close-quarter combat situations which could potentially lead to more in the Downtown Apartments section.
- Next to the E Flag Apartment, in the eastern section of the map, and below the Downtown outskirts is the Aamir Waterfront Fish Market. The interior of this structure is ideal for some mid-range engagement, while the dock located at its back, including a fishing vessel, is featured right next to the D Flag Docks.
Downtown Outskirts

- In the Downtown Outskirts, you’ll come across the water tower and Government building tower which offer two incredible positions for 360-degree sightlines, ideal for scouting, sniping, and pressuring enemies on the ground.
- The Downtown Outskirts area closes around most of the Downtown area and is identified by two tall structures, its namesake up the main central road and the complex government building that leads up to the E-Flag Apartment.
- To access both of these areas, you need to make way via long ladder climbs, with the water tower journey being all the more treacherous due to the vulnerability it puts you in when it comes to enemy gunfire. But make it up to the top to reap your reward which is a 360-degree view of the surrounding areas.
- The Water Tower positioning is a bit riskier due to no covers in sight. The Water Tower can be pretty rewarding and punishing at the same time due to its open nature. The height advantage can pretty much go out the door with the rooftop snipers positioned Downtown.
- The government building, in this case, is your best bet, being the safer choice. While it may not offer a great view of Downtown, it can aid you in competing against enemies in the nearby E-Flag Apartment, or help you command the Bay and the docks.
- The other structures in this vicinity feature a collection of one to two-story residencies. Take cover here while navigating the entirety of the Downtown area. Their roofs offer you opportunities to engage and ambush enemy snipers.
D Flag Docks

- The red apartment complex situated in the D Flag Docks region offers a strong watchpoint where mid-range weapons can take control of the Docks below. You can shoot through its metal walls to deal with enemies on the other side.
- The Docks are owned by Kushaak Construction and feature a simple sheet metal structure where the D Flag is located in Ground War Mode.
- Its obstruction to vision can prove useful, but its material is thin enough that you can shoot through it with any weapon. Enemies will be prone to pepper the area with hellfire so keep moving behind these walls to throw them off.
- Adjacent to this shack is the multi-story red apartment complex that offers great sightlines over to both of the Docks below as well as the Central Docks and nearby Apartments. Mid-Range weapons are ideal for easily defending the objective from the high ground. Snipers should face North or West out onto the Bay to be on the lookout for swarms of enemies rushing from land or sea.
- The last building in this region is a walled-off estate featuring two small living spaces. This estate can offer unique sightlines over the area or the nearby Crab Factory.
E Flag Apartment

- The E Flag Apartment offers one of the best vantage points on Sariff Bay’s eastern side. The top floors of the Apartments can be used for overwatch to gain sightlines to the Docks or even sections of the Downtown area and the Lighthouse Island.
- The Yellow E Flag Apartment building is a towering four-story structure. The building uses the first lobby for the E-Flag in Ground War and consists of two other indoor areas that you can access. These are the Cafe and the Bistro located on the second floor along with the fourth floor featuring a Penthouse Apartment.
- The Cafe encompasses two large windows that look over the lobby. Exploit them to your advantage and spot enemies rushing in from the main entrance or if they’re gunning for the flag below in Ground War mode. You can access it via two separate stairways or sneak into it by using the overhangs and crates over the building’s entry points located at the back.
- Naturally, the rooftop of the apartment is a cesspool of snipers picking off enemies over at the Docks. You can also access some unobstructed sightlines from this position all the way over to the Lighthouse Island and Downtown. In Ground War Mode, your best bet would be to sit back here and support aggressive squadmates making a move into these areas.
- There are other notable areas near the Apartments which consist of a metal station between the Central and D-Flag Docks, a vacant garage with an accessible roof that offers sightlines to the Lighthouse. The metal station is helpful for CQB Players to pass through before the rush to the fish market and other points in the West.
Strategies
Recruit Strats

- Sariff’s Downtown bears the most resemblance to traditional Call of Duty Multiplayer Maps, so if you’re starting fresh and jumping in straight from core 6v6, then feel free to navigate the tight cluster of buildings and sweep them one by one as you work your way towards the central street objective.
- You should practice checking rooftops and adopt it as second nature when navigating Downtown. Keep your eyes peeled for enemy snipers on rooftops prepping to take the kill shot.
- Learning from your experiences in Downtown will eventually help you get a feel for Ground War Mode and it’ll challenge your abilities and test your limits, preparing you for the better part of Sariff Bay as well as Warzone 2.0.
- Instead of wandering the open areas of the Bay which are closer to key objectives and becoming easy pickings for enemy snipers, new players should decide to navigate the Downtown’s Outskirts.
- It’s a pretty good initial move at navigating the large battle map while still getting some decent sightlines over most objectives. The vicinity to Downtown also makes it a decent area to plan a narrow escape if it ends up becoming a bit too busy for your taste.
- You should start off with a mid to long-range weapon in this area but if you’re concerned about being eliminated, then try to stick to one building at a time and traverse the outskirts a bit methodically once most of the threats are out of the picture.
Veteran Strats

- If the enemy takes control of the Downtown area, then your next best move is to adopt control of the seas and capture D and B Flags as well as the flags within the vicinity of your headquarters.
- Work with the buildings near those areas and use them for cover, protecting you from enemies from the North. Using Naval vehicles, defend yourself from boaters swarming from the surrounding islands.
- Water can serve as an incredible stealth asset. You can benefit from it by swimming around the docks and taking a stealthy assassin approach behind enemy lines.
- At the SpecGru Spawn, the Orange Communications Tower is the highest point in Sariff Bay, offering players incredible lines of sight across the Ground War Map and even extending to the surroundingareas of Adal.

- While you’d need to coordinate and communicate a bit with your teammates, positioning your best sniper on the communications tower here can offer an incredible edge over the enemy team. One thing to take into account is that bullets are now projectile based and not hit-scan, so notice the bullet drop when sniping from here, especially when going up against enemies from the Eastern ends of Downtown.
- You might stir up a number of enemies by sniping from this position. If they take sight of you and start raining hellfire, parachute out of here immediately because the Communications tower offers no cover, hence no protection. Parachute down to another area such as the Apartment.
Specialist Strats

- If you’re new to the game mode, then it’s best if you stay away from the small island adjacent to the Lighthouse. But to older players who know how to exploit natural cover, it can lead to some incredible counter-plays.
- The rocks on the island can provide some great angles and sightlines leading up to the Lighthouse Island, some parts of the Downtown, and even the nearby Docks.
- It can also serve as a base of operations to set up counter-naval attacks on any vehicles in the area. Set up a launcher here and launch projectiles on any boat that passes through this section of the Bay.
- Sariff Bay also provides some decent parkour opportunities akin to Sa’id. The SpecGru spawn consists of a two-story building where you can practice hopping from the walls or dumpster onto the windowsills or the balcony. With enough experimentation and practice, you can strafe on small pipes that stick out of the building located in the second-story areas, to formulate a sneaky and effective traversal strategy.

- The cluster of three buildings in Downtown can be exploited all the way to the roof by taking this specific route. Vault from the wall to the balcony and then from the balcony to the short roof. You could optionally use the overhand with the couch under it to make your way South or navigate from the edge of this short roof onto the balcony’s overhang. Vault up here and then onto the small overhang above the door to reach one of the highest parts of this area.
- The Fire Station over at the Central Docks offers a defensive wall that can easily be mounted on top of. Rather than taking the obvious leap onto its South side, think differently and jump over the main gate to the roof section. Navigating from the roof to the ladder cuts down the time it takes to reach the tower section of the Fire Section in half.
Additional Tips
- SpecGru HQ
This side of spawn allows players to get a headstart to the Docks and Apartment Flags in Ground War Mode offering a strong break point before operators can venture towards the proper Sarrif Bay or anywhere else in Adal. - KorTac HQ
The KorTac spawn offers players an easy route via an outlet to the greater bay area. This allows for a speedy escape route or an otherwise head start at controlling the waters of the Sariff Bay. - Resort
The Resort Central Courtyard is pretty much its own island compared to the rest of the map. Try dropping in or using aerial killstreaks from above for the fastest way in, or sneak around using the nearby ladders and the Bay. - Lighthouse Island
The Lighthouse Island’s main museum section is a strong contender for close-quarter combat scenarios at the bottom. This makes it pretty difficult for snipers to access the roof of the Lighthouse, cutting off their sightlines to the rest of the map. In this case, snipers could take the ladders outside and ascend halfway up the tower and make the rest of the trip via the second staircase without dealing with any of the museum’s visitors below. - Downtown
The Downtown area offers new players the best introduction to Ground War Mode and Battle Maps in general. Given the compact nature of the Downtown Area, players might get the feel of a regular multiplayer map with a few Ground War additions here and there. Be on the lookout for enemy snipers above which is something newer players would need to learn as they figure out the ins and outs of Ground War mode along the way. - Tower Snipers
Two of the tallest buildings in Sariff Bay are the Water Tower and the SpecGru Communications Tower. Exploit them to the best of your abilities to nail some longshots or use these locations to scout the perimeter and relay information to squadmates. Remember to get down before the enemy sees you as these positions offer no cover whatsoever. - Sariff Bay – North
Making your way to the Northern part of Sariff Bay means that natural elevation will work for you, considering that the Downtown section of the map slopes from North to South. - E Flag Apartment
The E Flag Apartment area features a cafe that has a double-window overlook to the lobby. Use it as a means to defend the objective in Ground War or take a look at any incoming enemies who decide to walk right through the front door. - Bay Waters
Sarif Bay’s waters can be easily exploited by stealth operators. Try swimming through the waters and navigating off the South Shore to the various docks, avoiding passing enemy boats to nail a longer yet more rewarding flanking strat. - Parkour
Operators skilled at the game’s movement mechanics can exploit the various structures of the game to quickly navigate from the Downtown section of the map all the way to the islands and more. Get a feel for vaulting up to rooftops, balconies, and overhangs. It might as well create a new and effective way to ambush enemies that are in a superior position.
Conclusion
And that’s pretty much it for our comprehensive Sariff Bay Multiplayer Map Guide for Call of Duty Modern Warfare 2. The Open Beta has ended but you can consult our guides before you step into Sariff Bay once again when Modern Warfare 2 officially releases on October 28, 2022. And later, you’ll get to exploit your knowledge of Sariff Bay when the POI is featured a second time in Warzone 2.0 on November 16, 2022.
If you still have any questions, let us know in the comments below. Stay tuned for more on VIDEOGAMER. Till then, peace out!
About the Author

Call of Duty: Modern Warfare 2 (2022)
-
UnknownUnknown
- Platform(s): PC, PlayStation 4, PlayStation 5, Xbox One, Xbox Series S, Xbox Series S/X, Xbox Series X
- Genre(s): Action, First-Person Shooter, Shooter