You can trust VideoGamer. Our team of gaming experts spend hours testing and reviewing the latest games, to ensure you're reading the most comprehensive guide possible. Rest assured, all imagery and advice is unique and original. Check out how we test and review games here
Call of Duty Modern Warfare 2 is making a return, over a decade later, and it’s coming back with next-gen graphical fidelity along with lots of additional content in the mix. Players get to duke it out in 6v6 core maps along with the new Battle Maps catered for the new Ground War Mode in the Open Beta scheduled from 24 September 2022, to 26 September 2022.
As for the official release, the game will come to light on October 28, 2022, with Warzone 2.0 releasing alongside Modern Warfare 2’s first season set for November 16, 2022.
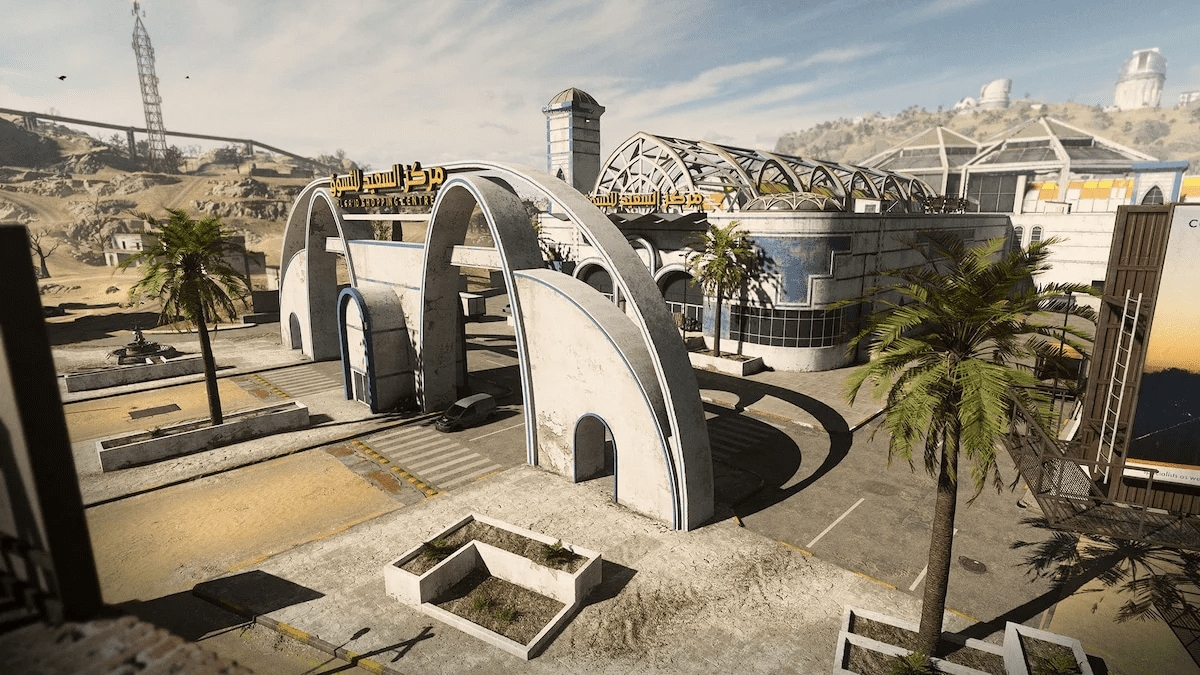
Sa’id Map Overview
Today’s guide focuses on the new large-scale Battle Map that pits 64 players against each other in a 32v32 match-up. Players will get to enjoy long-range gun fights along with mid to short-range close-quarter opportunities. Modern Warfare 2 players will get to experience one of the key Points of Interest that is set to feature in the upcoming Warzone 2.0’s map Al Mazrah.
Sa’id is the United Republic of Adal’s second most populated city, and that is when it was actually populated. The city served at the forefront of international trade. The city not only fuels the country’s economy but also serves as a center for pleasure, entertainment, and recreation. The city, once a symbol of prosperity and good fortune is now a barren husk of its former glory.
In Ground War, KorTac and SpecGru operators are forklifted down to the Eastern and Western regions of the map. SpecGru operators get to rush to the mall while Kortac agents make their way from the Harbor’s Warehouses.
You can spot a few suburban areas such as the El Samman Cemetery and the formerly thriving Sawah Village just south of Sa’id’s Carnival.
In the Eastern region of the map is Sa’id’s Port where the river meets the greater sea.
Players will also come across an intricate network of underground caves within a small village just north of Sa’id’s mall.
Wander your way West of the Mall and past the river to find the Observatory with the destroyed Dome.
Headquarters
Headquarters are not only starting points but act as safe zones for operators. Note that respective headquarters cannot be accessed by opposing teams if they wish to do so in the Ground War Mode.
KorTac Headquarters
- The cluster of Harbor Warehouses shouldn’t be overlooked by KorTac operators when they spawn. Players with a beefed-up sniper loadout have the opportunity to take some well-earned long shots early into the game. In this case, players should make their way to the four harbor buildings which are nearest to the Train Cars. These buildings offer some incredible lines of sight over the playable Ground War area and even farther when the map is introduced as a Point of Interest in Warzone 2.0.
- The two buildings found in the center line up right with the central district. Make your way to pick off enemy players that are focused on nailing some objectives. Additionally, you can eliminate enemies on the rooftop by prepping for the ideal positioning.
- The buildings towards the outer sections of the warehouse provide a clear view of the streets encompassing the district. These provide opportunities to flank enemies waiting to make flanks of their own. The outer buildings also provide easy access to nearby structures such as the toll booths around the Soccer Stadium and located near the Carnival, the repair shop.
- But laying low and getting into a snipe fight could pose as a subpar strat as SpecGru operators can make move on you and take control of the entire district. This means you need to make the move sooner or later before SpecGru gets the jump on you. Rush when you get a few initial kills along with your teammates through the Train Cars to take control of objectives or to better position yourself for the incoming onslaught of 32 SpecGru operators.
- If you’re planning to go on foot(yes you can drive around vehicles too), then the quickest way to the central district is by way of the Train Cards and the Central Office. However, if the enemy is raining bullets on you from the opposing Rooftops, then your best next move would be to navigate your way to the South Side of the map by way of the auto store and through the Carnival. This will help you avoid SpecGru’s line of sight.
SpecGru Headquarters
While KorTac gets the high ground, SpecGru will have the upper hand in raw speed. The Mall’s forward position allows expedited control of the Eastern Lot of Sa’id’s Districts.
- SpecGru gains access to Sa’id Shopping Mall which consists of both floors of the western wing along with the main entrance. You should avoid heading to the rooftop as it’ll take a considerable amount of time and KorTac will inevitably gain the Rooftop positioning advantage. The Headquarters also includes the Medical Center located near the riverbank along with two small houses located at the North.
- To pick off KorTac Operators rushing through the Carnival, the Medical Center proves very reliable for picking them off at the end of the Carnival’s street. The latter structures are pretty useful for cover as you make your way to the key store/ apartment complex and the fire station located at the end of the Soccer Stadium’s street
- One thing to take into account is that the Mall is just a few steps away from the Eastern Block. This is where you’ll most definitely run into a Ground War objective. You’ll find it near the electronics store and the Barbershop. While KorTac operators will have to rush through the Train tracks, Spec Gru agents can comfortably stroll to the nearby objective past a single street.
Zones
- The following districts of Sa’id’s battle map act as lanes:
- The Carnival and the Gas Station are located in the Far South.
- The Soccer Stadium is located in the Far North.
- Located right below the Soccer Stadium is the Dirt Lot.
- Within the Dirt Lot and East of the Rohan District along with the buildings south of the empty ground form the East Lost.
- Anything located towards the West forms the West Lot.
Strategies
Recruit Strats
- Make sure to keep a low profile at the beginning of the game. Don’t be the cocky player that just jumped in from 6v6 core maps. Take it slow. You’ll thank us later. You can take benefit of the alleyways and Sa’ids apartments to look for close-quarter combat opportunities.
- The tight and narrow formation of the alleys and the apartments allows run and gun loadouts including small arms, shotguns, and SMGs to thrive. You can take control of the firefights here and run back and forth between floors, but stay close to the ground to ensure cover from all directions. Otherwise, you might just end up getting picked off by a Sniper Rifle from across the map.
- Keeping yourself grounded is pretty useful when it comes to dealing with snipers looking for easy picking on the roofs. Snipers will find it cumbersome and tedious to pick off players directly below them. So, if you see an isolated enemy sniper, figure out a way to get close discreetly while also avoiding the roofs.
- Aerial streaks are still a thing in Ground War Mode, especially at the Carnival, building rooftops, and the Dirt Lot and that is indeed nerve-wracking. This means everyone will be busy looking towards the skies with their air assault loadouts and you could very well counter with ground-based attacks.
- Using traps such as suppression mines and claymores and cluster mines can allow you to obtain some easy kills but it’s all about positioning them just right. Place traps and field upgrades near the staircases and doorways of buildings. If you’re looking at taking out larger vehicles, you can set up larger traps in the alleyways.
- Dotting the district with these silent and discreet traps can lead you to rake up plenty of kills, causing problems for the opposing team. You can up your game by also equipping the DDOS Field Upgrade, the Spotter Perk, and just about anything that can help you sweep mines on the ground.
Veteran Strats
- If you’re quick on your feet and can easily avoid enemy fire, then it could be a good move to play with an aggressive approach in mind. You could jump between buildings where your friendly snipers are setting up posts.
- Starting from the Western Lot’s Mixed-use building or from the bank, players can parachute right down near the Courtyard House where the C Flag is set to appear. You could land in front of the entrance or on top of the nearby office.
- East Lot players get to play aggressively too. Just glide down after a speedy dive from one of the buildings located near the street, and land in the Carnival’s flank route.
- Now, you’d find it strange to bring a sidearm to this large-scale battle map, but we’d recommend one. If your teammates are decked out with anti-vehicle launchers to destroy anything that moves in sight, we’d recommend you go with a side-arm. You’d be surprised what a peashooter can do considering the number of hangable ledges and ladders that span Al Sa’id’s structures. It’s basically a honey pot for one-handed sidearm kills.
Make sure to fully deck out your sidearm over at the Gunsmith and then proceed to eliminate snipers on rooftops with some well-earned close-up shots.
Specialist Strats
- When moving away from the main spawn zones, you can spot a few billboards that you can, fortunately, climb onto which overlook wider parts of Sa’id.
- You’ll find a pair towards the side of the Harbor Warehouse, one near the Soccer Stadium, and another pair close to the Mall. The Soccer Stadium Billboard is a goldmine when it comes to offering incredible sightlines. This billboard offers sightlines spanning the entire southern section of the map. In addition, you can fling equipment right into courtyards right across the street.
- One thing to note here is that climbing up a billboard has its own fair share of risks. Make sure to communicate to your team that you need backup and protection in your most vulnerable moment. Squad members should position themselves under the billboard with long-range weapon cover. The climb can be pretty difficult considering the risks so make sure to include a Tactical Insertion and place it between the billboards for an easy respawn site.
- If you’re ever in the mood for parkour, then Sa’id is your best bet. Players can experiment and find routes of their own while jumping between rooftops and buildings but we already have a few ideas lined up for you guys.
- The First route is fun but kind of tricky and risky at the same time. You’ll parkour your way from the Dirt Lot to the yellow building. Use the nearby wall to mantle up to the small balcony which faces the street or onto the slanted overhang. Using this small patio section, you can make your way up the ladder all the way to the top or jump sideways to make your way to the patio of the nearby building.
- On the opposite end of the map, take note of the bastions which are encompassed by white and orange barricades. Use them to get from the ground to the top of the other buildings found in the East Lot. Jump from the Northern Bastion onto the beige balcony. You can either opt to make your way through the building or proceed to jump straight on top of the electronics store.
- Another parkour route for this same lane features a blue dumpster. Vault on top of it to make an entryway for the Western Lot’s mixed-use building. You can then jump down an air conditioning unit to then, get on top of the bombed-out section. Additionally, the player can hop onto one of the balconies that provide a sightline for the Train Cars.
- Last but not least is parkour opportunities at the Mall. You can navigate to the top for sightlines stretching towards the district that are found near the Harbor’s Warehouses. But it’ll take a bit of time and dedication on your part.
- Rush to the north where the parking lot is situated, specifically, you’ll come across a truck and a box. Vault your way from the box to the roof of the ruck and then leap your way to the stack of crates. This will provide you a leap way for the roof. Now, you can mantle your way to the top by leaping towards the nearby wall.
- You can angle yourself for sightlines from the front entrance’s installation to get some long shots. Remember, there are a few skylights that you can jump down from in case you need to make a speedy escape.
Additional Tips
- KorTac HQ
The multiple buildings located at KorTac headquarters offer great sightlines that span over the middle district. Snipers can exploit this position and get great picking opportunities. - SpecGru HQ
Although they might not have the high ground, SpecGru gets the benefit of speed and timing. E Flag for Ground War Objectives appears right near the spawn point. Operators can snag the flag before traversing deeper into the district.
- Sidearm Benefits
Ground War provides a great opportunity for launchers, especially when going up against enemy vehicles, but the occasional sidearm can prove beneficial too. If you’re in the mood to stick to the central area, hang off ledges, and climb ladders, sidearms can work really well. - Snipers
When you set foot on Sa’id, you’ll find out that every building offers an accessible roof. This offers users great sightlines over entire sections of the map, especially close to objectives.
- Billboards
If you’re not having a great time in Sa’id due to all the snipers across rooftops, then climb on top of a Billboard. While this isn’t an easy feat, a squad mate supporting you can make the climb easy. The risk is worth it for the great sight lines you get in return.
- Homes
Houses with courtyards can offer a bit of breathing room. Make your way into one using a close-quarter combat loadout and use it as a respawn site for your squad. - Stadium Streets
You can navigate through the long roads of the stadium using a vehicle. Drive past the two streets and then head into the central district of the map. - Flank Route
Use the downtown path as a flank route to make your way to the Carnival or Waterfront. Go around the district, but keep in mind that snipers might be positioned on the roofs of the apartments past the street, Gas Station, and Restaurant.
- CQB
If you’re in the mood for some close-quarter combat, then head over to the apartments and buildings found across Sa’id. Buildings provide the ideal scenarios for players to use their SMGs, shotguns, or small weapons of their preference. Don’t forget to set up mines and traps along the way.
- Parkour!
Sa’id is an open playground for Call of Duty Parkour enthusiasts. Make use of your environment, buildings, and stacked objects to find routes off the streets and heavy traffic. If you’re feeling all the more daring, drop off from roof to roof and fly your way over to objectives.
Conclusion
And that just about wraps up the Sa’id Multiplayer Battle Map guide for Call of Duty Modern Warfare 2. Enjoy the map while you can, because you won’t see it again till October 28, 2022. Later, a full Warzone 2.0 release slated for November 16, 2022, will feature Sa’id as a point of interest along with 17 other POIs.
Let us know if you have any questions or queries in the comments below. We upload Call of Duty Modern Warfare 2 guides daily, so stay tuned for more. Till then, see you later!
Call of Duty Modern Warfare 2 will officially release on October 28, 2022, for the Xbox One, Xbox Series S|X, PlayStation 4, PlayStation 5, and Windows PC.
About the Author

Call of Duty: Modern Warfare 2 (2022)
-
UnknownUnknown
- Platform(s): PC, PlayStation 4, PlayStation 5, Xbox One, Xbox Series S, Xbox Series S/X, Xbox Series X
- Genre(s): Action, First-Person Shooter, Shooter