
You can trust VideoGamer. Our team of gaming experts spend hours testing and reviewing the latest games, to ensure you're reading the most comprehensive guide possible. Rest assured, all imagery and advice is unique and original. Check out how we test and review games here
Looking for a Trepang2 boss list? Trepang2 is an ultra-violent, action-heavy stealth shooter. With time slowing mechanics and fluid combat it’s perfectly designed for taking on some truly wild foes. This of course includes a number of bosses. From deadly mutants to fellow super soldiers and even the paranormal, you’re going to encounter a lot of significant threats you’ll need to overcome if you want to beat the game.
Especially on higher difficulties, these boss fights can prove to be extreme challenges. Therefore its wise to give yourself every edge in combat you can. In this Trepang2 boss list, we’re going to cover all of the bosses you’ll encounter in the game, as well as our top tips and tricks on how to beat them. If you need some more practice with Trepang2’s combat though, check out how to customise guns in Trepang2 and our Trepang2 stealth guide, so you can refine your approach to fighting. Beware of spoilers ahead, of course.
All Trepang2 bosses and how to beat them
None of the boss fights are particularly hard, especially if you’re racing through the game on the easiest setting. Here’s all of them, along with how difficult we found them.
| Boss name | Difficulty |
| Mothman | Easy |
| The Enforcer | Easy |
| Specter 3 Actual | Easy |
| The Patriarch | Medium |
| Subject 83 | Easy / Medium |
| Horizon One | Medium / Hard |
| Subject 107 | Hard |
How to beat Mothman
Mothman is your first big boss fight in-game. You’ll encounter him throughout the latter half of Mission 2: The Pandora Institute. He’s a large, bat-like mutant created by Dr Emerson and his team. Once you blow the reactors, you’ll need to wait for an elevator, and here you’ll have to fight Mothman for the first time. This section is pretty simple – just focus on keeping your distance, putting damage into him with mid-range weapons. Once you get above ground, the real fight begins.
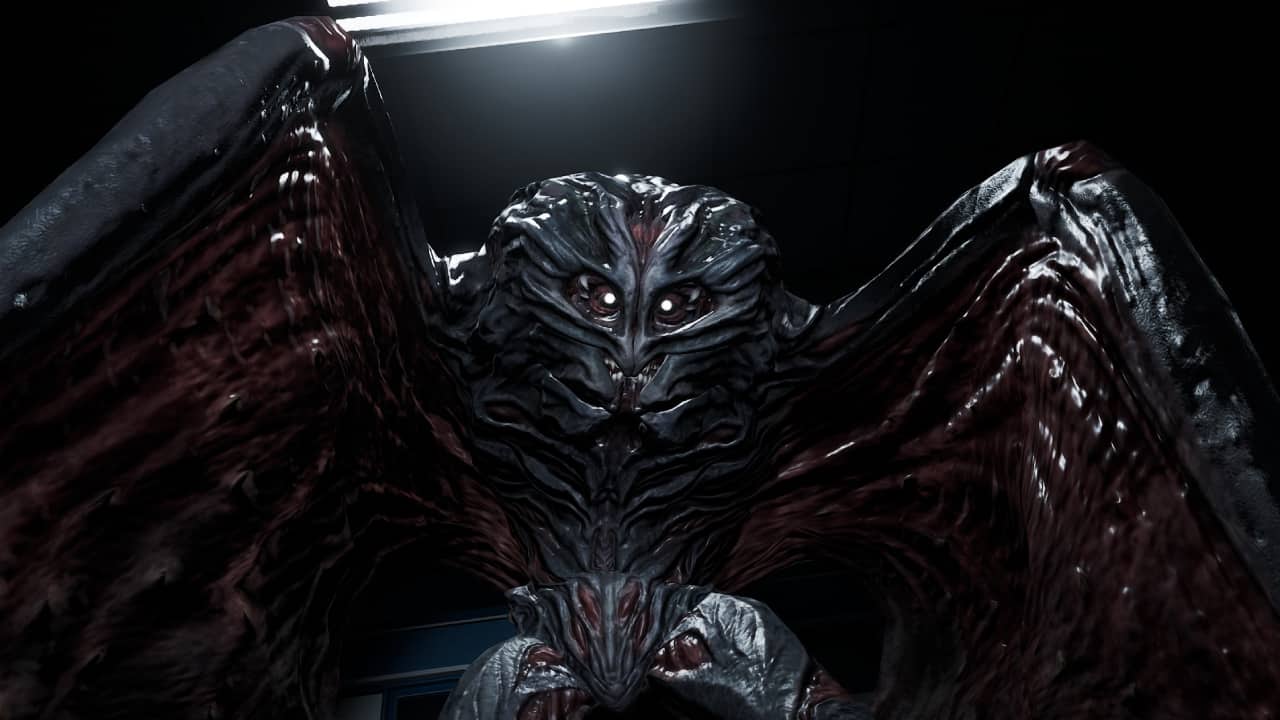
Be sure to dispatch the zombies that Mothman creates at the start of the fight quickly. He won’t spawn any more, but their presence can prove to be a disruption to the fight.
Once it’s just the two of you, keep one thing in mind above all else: This fight is all about using your environment. The tight spaces of the maze will make it easy to outflank Mothman’s poor pathfinding, creating plenty of openings. The shotgun, SMG, and rifle will all excel here, but the true DPS-dealer here are the claymore traps.
Scattered around the arena are claymores taped to the walls, with laser sensors attached. Anything that moves through these will detonate the explosives, and a direct hit can kill you outright. However, if you activate your cloak using E, you can pass through the lasers without triggering them while invisible. Lure Mothman into as many of these traps as you can by baiting him and then safely passing through the sensors. Each hit by the explosives will deal massive damage to him, and end the fight far more quickly. Be advised though, these traps won’t be present in the arena on higher difficulties.
How to beat The Enforcer
The head of cult security at Jorvik Castle, The Enforcer is a formidable opponent. He’ll burst into the arena you fight him in by literally bursting into it – using his minigun to shred a plywood wall.
The minigun is one of the deadliest weapons in-game, and will crack your armour like an egg. Luckily, the arena is once again a boon here. Make good use of the elevation and cover to hide from his barrage of bullets, countering when he pauses to let the barrel cool. The minigun’s main weakness is its long windup, which gives you generous openings to deal damage.
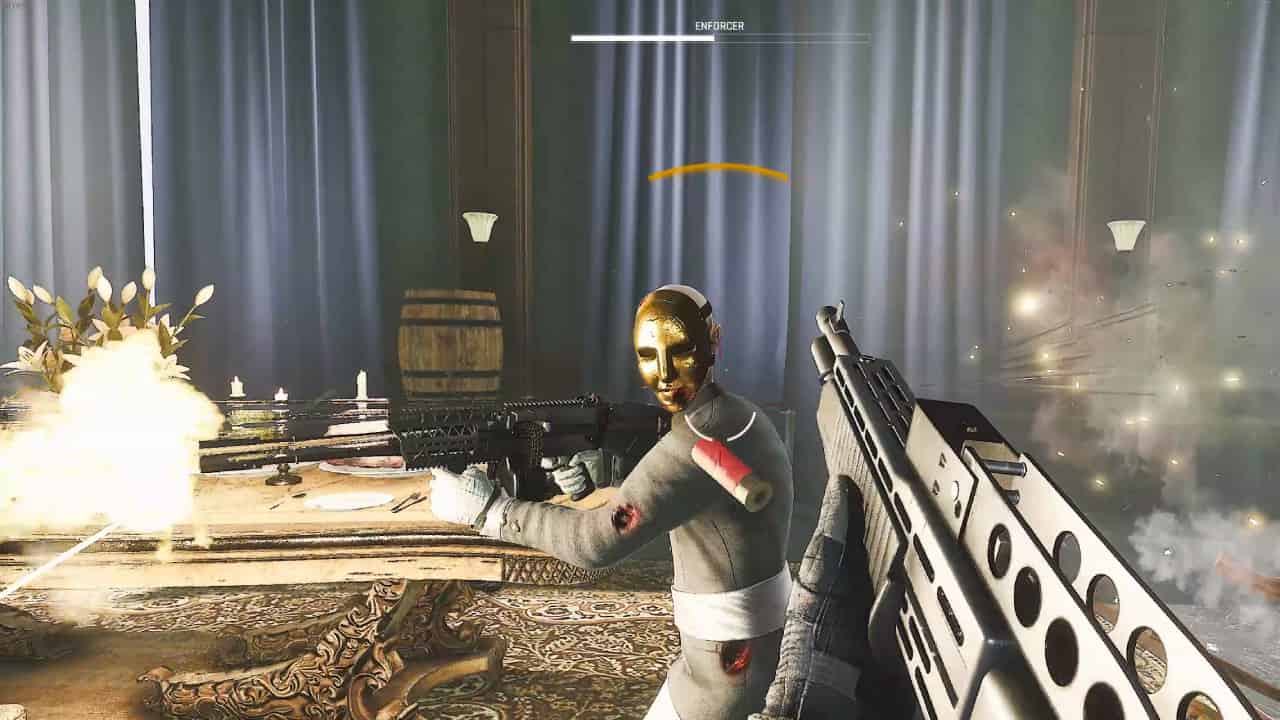
The rifle and grenades are both good damage dealers for their DPS, but be sure to conserve some ammo, as he’ll spawn in a wave of enemies halfway through the fight to catch you off-guard. If your arsenal isn’t looking too full by this point, make sure you’re up to date with how to unlock all weapons and throwables to help you out in this engagement.
The verticality of the room layout also provides opportunity to outflank The Enforcer, especially during the enemy wave phase, after which he’ll spawn back near the centre of the ground floor. Getting behind him opens a fantastic damage window, and you can even risk closing in with a shotgun here, as the minigun’s weight means he’s slow to turn around.
How to beat Specter 3 Actual
Somehow getting even unluckier than his massacred squadmates, when you find Specter 3 Actual, The Patriarch has turned him into a massive, grotesque mutant with even more speed and ferocity than Mothman. Although he technically doesn’t have a boss health bar, his monstrously high damage resistance and fierce attacks earn him a spot on this Trepang2 boss list regardless.
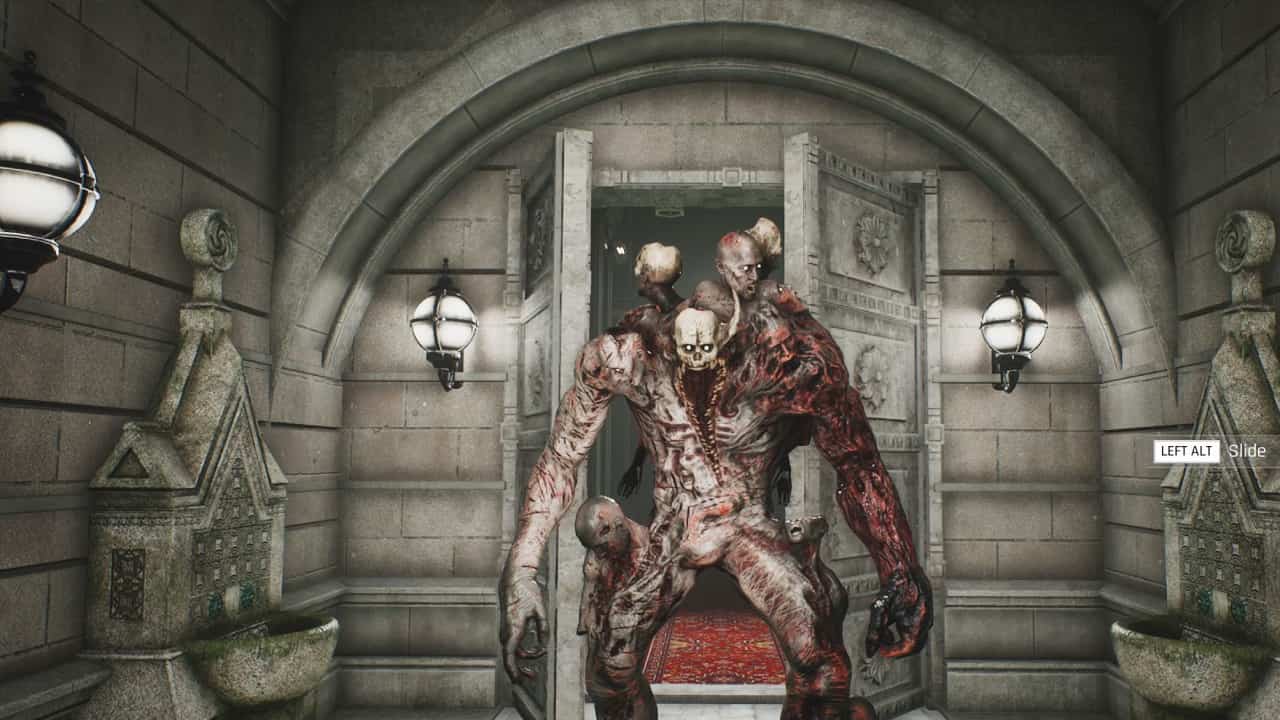
Once more, level design is key. The fake houses of the paintball-esque battle sim grounds provide a lot of routes for gaining cover from Specter, but be aware that he can and will tear through the plywood walls he encounters, reducing your cover over time. More pressing is the issue that Specter 3 Actual’s attacks are all primarily melee based, with one long-range grapple attack to be wary of.
Ideally, you want to keep space a priority – he will chase you the whole encounter, and his speed is no joke.This is even more prevalent due to his absolutely monstrous health pool.
Fast firing weapons are your friend here, but if you can open up the space and have focus to spare, quickscoping with the DMR is a good way to dent his health bar as well. If you have grenades, use them liberally, but be sure to account for the distance he’ll close when you throw them.
How to beat The Patriarch
The Patriarch is the leader of the cult you’ve been decommissioning throughout Jorvik Castle, but he’s something else as well: A fellow super soldier. With a three-part healthbar, immense speed, and high damage, The Patriarch will likely be the toughest opponent you’ve faced up to this point.
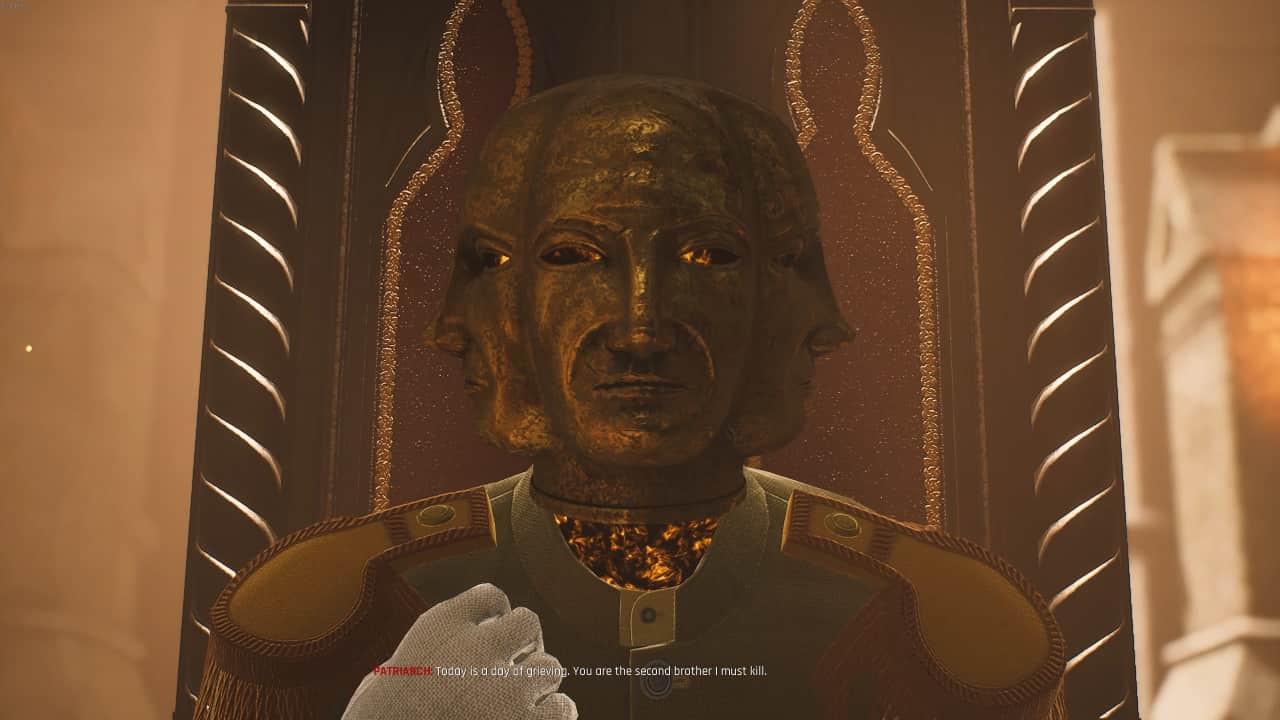
Use the arena – you’ve got a big open room with raised platforms at each side. Although cover isn’t immense here, the distance opens up the potential for long-range combat. You can close the distance if you prefer, a range where the bolt gun shines. It’s a weapon you may have picked up from the elite cultists around the level, but if you don’t have one, a few will spawn in during this fight. If you’ve been diligent, you’ll have likely found the penetrator attachment for the bolt gun by now. The penetrator attachment allows you to switch the bolt gun from tri-micro-grenades to single shot kinetic projectiles. As long as your aim is good, hits with these can inflict massive damage.
At each damage gate you meet, The Patriarch will retreat, and spawn in a massive wave of enemies. Keep on the move and use your focus, and these shouldn’t be too overwhelming to deal with. But watch out for the third damage gate in particular, as he’ll spawn in another Specter Three Actual mutant.
How to beat Subject 83
Subject 83 is probably the most unusual enemy you’ll face in the game, not being a character, but rather a (possibly sentient) crystal that can manifest living shadows and teleport individuals. In our playthrough for our Trepang2 review, this was one of the most interesting engagements in the game, even though it wasn’t all too difficult upon deciphering the mechanics.
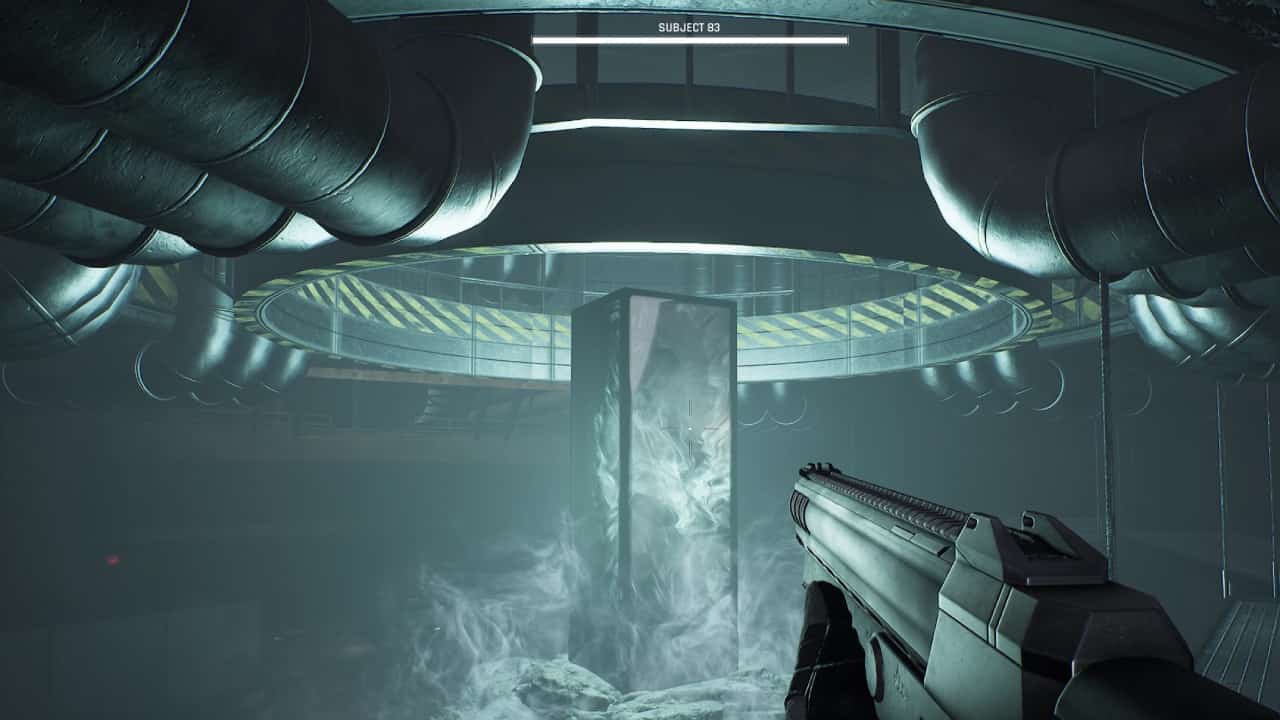
This is also more of a puzzle boss than a combat encounter. To beat Subject 83, all you need to do is fire the experimental laser stationed in front of it as you enter the room. To do this you’ll first need to flip three breaker boxes. Visit each box and you’ll find shadow people guarding them. After you’ve visited the third, a wave of hazmat-suited horizon soldiers will burst in. All you need to do is wipe them out, as their corpses seemingly draw Subject 83’s attention. It’ll divert resources from the shadows, opening up the path to one box. Repeat the process twice more, and the laser will be ready to fire. Then, you just need to pull the lever next to the laser, and watch as Subject 83 is blown to bits.
How to beat Horizon One
Reach the end of the final mission, and you’ll finally get an audience with Horizon’s CEO, Anton. This isn’t a very traditional meeting, as Anton attempts to upload his consciousness to a digital format and you run around his office destroying human brains in jars that act as connection nodes.
At the climax of this fight, the final brain in a jar will appear, attached to the underside of the CEO’s personal helicopter, Horizon One. This is a fight against the clock as the upload process unfolds, so the aim here should be speed.
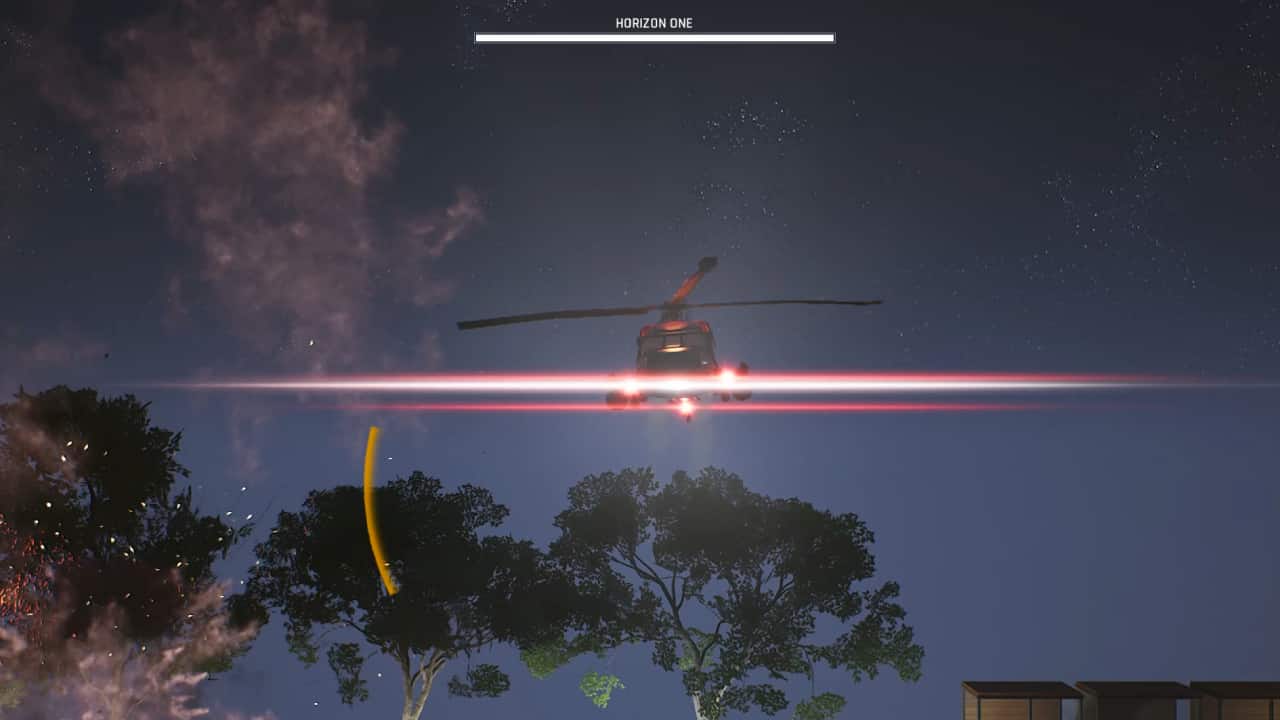
Plenty of enemies will spawn in prior to and during the fight, but if feasible, ignore them and focus fire on the helicopter. It’ll unleash torrents of bullets at you from mounted miniguns. Just like The Enforcer though, you’ll have wide openings in between the weapon cooldowns to deal damage. If your aim is good and you have them unlocked, the bolt gun or grenade launcher are excellent choices for damage. Make sure to customise guns you bring into this fight too so that they’re optimised for damage. If you’re less sure of your aim, the SMG is another decent shout. Horizon One doesn’t have a lot of health, so sustained fire from weapons with large magazine capacity is a good approach.
How to beat Subject 107
Now we reach the final entry on our Trepang2 boss list. Following the revelation of the Syndicate’s betrayal and your subsequent escape as Subject 106, the seemingly true villains of the story will unleash their failsafe against you: A replacement. Subject 107 is a super soldier, equipped with serious speed, damage and durability. He is your closest match out of any of the opponents you’ll face in-game. But there is a strategy to defeating him.
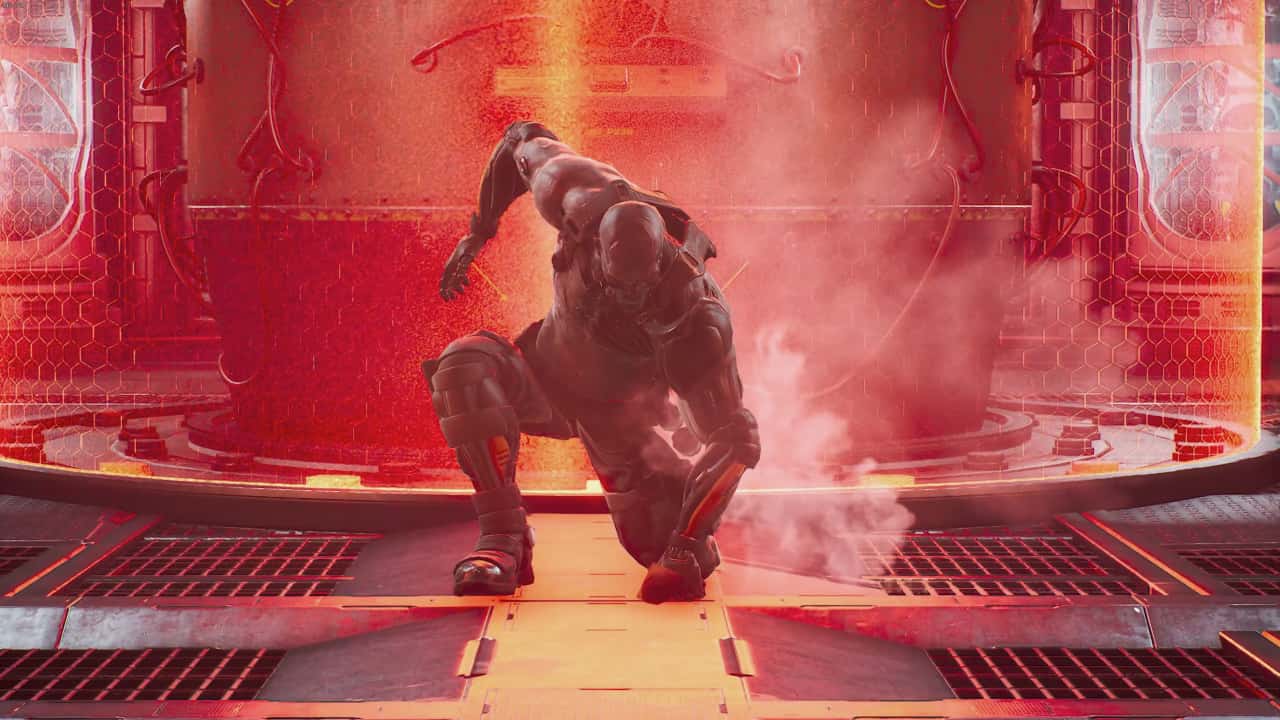
He can block weapon fire with his katana, but that same blade is also his greatest weakness. Subject 107 will be unable to block when he’s moving quickly, and is particularly vulnerable in the moments after initiating a devastating dash attack. Time your slides right, and you can dodge right under the hits, then turn back on him and unload lead. Sliding is in fact your best friend in this fight, giving you an agility option that Subject 107 struggles to counter. Still, try to keep your distance where possible. He can chunk your healthbar should an attack connect. However, since the fight takes place across enclosed spaces, this isn’t always an easy option. Also make sure to use focus as much as possible – it’s an ability that 107 doesn’t share.
The same isn’t true for cloaking, and 107 will do it all the time. If you’ve unlocked the incendiary attachment for the shotgun, it’s a hugely beneficial tool here, as the flames will stick to him and give away his position while invisible.
Who is the hardest Trepang2 boss?
Every entry on our Trepang2 boss list can prove a deadly threat in their own right, and the challenge will probably differ greatly for each player. For our money, we’d say that Subject 107 is the hardest boss in the game, due to his speed, aggressiveness, and multitude of attacks.
That covers our Trepang2 boses list, and how to beat each of them. Hopefully you found this Trepang2 boss guide useful. Once you’ve gone through the game once though, you can always hop back in with an array of modifiers and a new style. Take a look at all of the Trepang2 cheats and how to change appearance in Trepang2 if that sounds in line with your way to play the game.
About the Author


