You can trust VideoGamer. Our team of gaming experts spend hours testing and reviewing the latest games, to ensure you're reading the most comprehensive guide possible. Rest assured, all imagery and advice is unique and original. Check out how we test and review games here
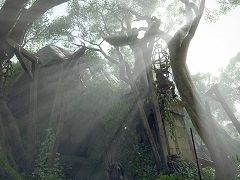
Alright, we’ll level with you, the first chapter doesn’t actually have any treasure. Neither do a bunch of the others, actually, but saying ‘Chapters 1-10’ is much less awkward than ‘Chapters 2, 3, 6, 8’ and so on. Look, this is where to find all the treasure in the first half of the game, what do you want from us? We’ve included pictures to help you spot when you’re in the right area, too.
Treasure in Chapter 2 of Uncharted 4
1. Panamanian Cat Pendant
After the first cutscene in the prison, slide down the slope on the right and climb up on the left to the area where you find your grappling hook. Drop down into the well and grab the treasure at the bottom.
/https://oimg.videogamer.com/images/da5a/1_panamanian_cat_pendant.jpg)
Once you’ve jumped from the smaller, red roofed tower onto the side of the main building, and shimmied up the wall, drop inside. Before you grapple rope your way out check the base of the pillar right opposite the grapple point. You could maybe use this knife to shank someone back in prison! But that sort of behaviour is not encouraged by this website.
/https://oimg.videogamer.com/images/f969/2_navaja_folding_knife.jpg)
Treasure in Chapter 3 of Uncharted 4
3. Antique Padlock
At the start of the chapter head right until you see a fallen log resting over two bits of rock, making a little arch. Under the log is the padlock. Amazing what you can find at the bottom of a river.
/https://oimg.videogamer.com/images/f6e3/3_antique_padlock.jpg)
4. Chiriqui Shark Trinquet
Once you’ve moved to the second area of the dive swim down and left into arock tunnel formation. The treasure is on the bottom at the fork in the tunnel.
/https://oimg.videogamer.com/images/758a/4_chiriqui_shark_trinquet.jpg)
5. Antique Pocketwatch
When you reach the sunken packing crate swim little right and behind it to the back wall (there should be a broken log sticking straight up out of the sand; keep to the left side of that). There’s a gap between two groups of weeds just in front of the back wall that you can swim through, then turn immediately left to find the pocketwatch on a small outcrop on the rocks. When you look behind you the log should still just be in sight (it’s on Drake’s left in the picture).
/https://oimg.videogamer.com/images/955c/5_antique_pocket_watch.jpg)
6. Antique Arcade Token
This one’s pushing the limits of what can be considered treasure, but is found on the shelves on the centre platform after you come up from your dive. Although Drake could probably have sourced one from Ebay if he really wanted it.
/https://oimg.videogamer.com/images/cc26/6_antique_arcade_token.jpg)
Treasure in Chapter 6 of Uncharted 4
7. Mughal Water Container
From the starting cutscene follow Sam round towards the side of the villa. At the cliff edge overlooking the bay, with the villa on your right, move to the far left edge. The treasure is in the corner, just behind a bush.
/https://oimg.videogamer.com/images/6030/7_mughal_water_container.jpg)
8. Nephrite Brass Cup
Once you’re in the lemon grove head to the furthest right corner of it, against the side of the villa. The windowsill here has your treasure.
/https://oimg.videogamer.com/images/116b/8_nephrite_brass_cup.jpg)
9. Viking Cloak Clasp
When you’ve made it inside the villa in your spiffy tuxedo, and have made your dastardly heist plan with Sully and Sam, turn round from where you are on the upper walkway and go into what we think would be termed a day room behind you. Swing left to find a little desk with the treasure on it.
/https://oimg.videogamer.com/images/3546/9_viking_cloak_clasp_1.jpg)
/https://oimg.videogamer.com/images/a166/9_viking_cloak_clasp.jpg)
10. Mother of Pearl Horn
Next, go along the walkway and out of the first set of French window style doors on your right. Go to the right end of the balcony and the treasure is on the wall. The criminals running this villa sure leave a lot of stuff lying around.
/https://oimg.videogamer.com/images/a523/10_mother_of_pearl_horn.jpg)
11. Persian Bronze Bowl
When you and Sam have made it down into the cellars take the first left, into a room with a lot of round folding tables leant up on the left wall. There are a bunch of crates and boxes stacked on the other side of the room, next to a really short bunch of steps. The treasure is on said boxes, but you have to get in the space between the boxes and the pillar on your left to pick it up.
/https://oimg.videogamer.com/images/a729/11_persian_bronze_bowl.jpg)
12. Brass Barber’s Bowl
Go down the stairs in the cellar (the ones next to the room full of security guards that you can briefly spy on through the door) and at the bottom turn immediately right. The bowl is right in the corner under the stairs.
/https://oimg.videogamer.com/images/ab6c/12_brass_barbers_bowl.jpg)
13. Syrian Vase
Once you get out of the vents and into the gardens with Sam, go to the left, back towards the sea. Drop into the courtyard area that faces the bay, and follow it round right until you reach a fire ladder hanging from a small balcony. Climb up that, then back around the building to the left using the drainpipes, until you’re over a small red tiled roof. Drop down to get the treasure in the corner.
/https://oimg.videogamer.com/images/8926/13_syrian_vase_1.jpg)
/https://oimg.videogamer.com/images/0018/13_syrian_vase.jpg)
14. Persian Candlestick
After Sam kicks down the ladder for you in the gardens, go up it and turn left at the blue door. You should be looking at a doorway with a bright light above the arch and decorative brickwork crosses either side. To the right of this is a kind of balcony area; get there by climbing on the roof above the light and then jumping on a diagonal from there. The treasure is by the second column.
/https://oimg.videogamer.com/images/1801/14_persian_candlestick_1.jpg)
/https://oimg.videogamer.com/images/8cf1/14_persian_candlestick.jpg)
15. Mughal Dagger
Alright, you’re still trying to get to the generator, and at one point you’re going to find yourself under the building, swinging on iron bars. Once you’ve come off the first set of bars onto a new ledge, face the ocean, drop down and hang off said ledge. Climb up the pillar on the right. The treasure is on the second handhold up on the pillar.
/https://oimg.videogamer.com/images/0129/15_mughal_dagger_1.jpg)
/https://oimg.videogamer.com/images/5e26/15_mughal_dagger.jpg)
Treasure in Chapter 8 of Uncharted 4
16. Redware and Silver Jug Flask
Go down the first slope of the hill and then turn left, going back up until you hit the top edge. It’ll slope into a little snowy area behind a rock, featuring treasure.
/https://oimg.videogamer.com/images/f870/16_redware_silver_flask.jpg)
17. Bronze Boar
On the right side the hill turns into a cliff that drops off into the sea. Jutting out, and slightly obscured by trees, is a taller bit of rock which has a cave underneath. Go into the cave to get you some.
/https://oimg.videogamer.com/images/3c8f/17_bronze_boar_1.jpg)
/https://oimg.videogamer.com/images/93e8/17_bronze_boar.jpg)
18. Carved Wood Kashkul
At the first big Shoreline camp you come to, built around some ruins, head over to the opposite cliff edge and go to the far right of it. The treasure is behind a tree and a crate covered by a blue tarp. (the Shoreline lads aren’t very observant, it seems, which is probably why they haven’t found the pirate treasure either).
/https://oimg.videogamer.com/images/e232/18_carved_wooden_kashkul.jpg)
19. Carved Nut Bottle
After dynamiting the door and climbing up through the stone ruin at the aforementioned Shoreline camp, go right and towards the tree branch you can grapple swing from, but don’t do it yet. On your left is a little low alcove with some boxes in. Use some of the dynamite you just picked up to explode them, and crawl through into a small cave which contains a nut that someone inexplicably carved into a bottle. Just shows you how rubbish historical people were.
/https://oimg.videogamer.com/images/e0b0/19_carved_nut_bottle_1.jpg)
20. Travelling Inkwell With Seal
As in it has a seal, not as in customers today get a free copy of Kiss From a Rose with every travelling inkwell they buy, although that would be pretty boss. At the very foot of the graveyard are two shale slide areas, the first with a few guards. Once you’ve gotten to the second slide, jump between bits of ruined wall to follow the bottom edge around, until you come to a larger bit of remaining building. You can drop down onto the outer edge and enter a room (missing the wall that faces the cliff). And here’s your treasure!
/https://oimg.videogamer.com/images/1aa5/20_travelling_inkwell_with1.jpg)
/https://oimg.videogamer.com/images/280d/20_travelling_inkwell_with.jpg)
21. Carved Ivory Vanitas
Apparently ‘vanitas’ means ‘extremely disturbing skull/face having its skin eaten by a lizard’. When you get to the big door to the graveyard don’t go through it. Go to the left side of it where you can see some hand holds. Climb up to a ledge, then up again to a room above the door with a statue, and aforesaid disturbing carving. Drake likes the weirdest stuff.
/https://oimg.videogamer.com/images/c0b7/21_carved_ivory_vanitas1.jpg)
/https://oimg.videogamer.com/images/9d08/21_carved_ivory_vanitas.jpg)
22. Scottish Ha’penny
Once you go through the secret door in the graveyard, go down into the tombs until you get to the second level with the floor covered in mist. At the bottom of the stars is a doorway on the left, leading round to a statue. Collect your antiquated and discontinued currency from the foot of the statue.
/https://oimg.videogamer.com/images/dc90/22_scottish_hapenny.jpg)
23. Slipjoint Clasp Knife
After leaving the graveyard, and having a brief conversation with Sully over the radio, you’ll head round to an area of different ledges with three guards patrolling. Hug the left wall until you come to a dead end and a small tunnel on your right. Go into the tunnel and crawl into a little cave, with a skeleton, a flintlock pistol, and the treasure, which is on the boxes in the corner.
/https://oimg.videogamer.com/images/959c/23_slip_joint_clasp_knife.jpg)
24. Pewter Singing Bird Box
In the same area as above, and once you’ve taken out the three guards, look to the right. You should see a ledge you can jump to, which will take you into a small cave, now home to some regular boxes as well as the singing bird kind.
/https://oimg.videogamer.com/images/ec98/24_pewter_singing_bird_box.jpg)
25. Tortoiseshell Snuff Box
When Sam makes a snarky comment about how Nate breaks things all the time, and then breaks a bridge, this is your cue. You and Sam will climb up the cliff face taking different routes. Sam helps you up on your side and you proceed to have a conversation about hot cocoa as if you weren’t merrily killing soldiers and treasure hunting in the wilds of Scotland. At the point you have this conversation climb down the route that Sam came up, and go around to the right. You’ll come to the ledge with the remains of the bridge Sam just broke hanging off it. Up on this ledge is your snuff box (a disproportionate amount of the treasure finds involve tobacco somehow).
/https://oimg.videogamer.com/images/a547/25_tortoiseshell_snuff_box1.jpg)
/https://oimg.videogamer.com/images/5108/25_tortoiseshell_snuff_box.jpg)
26. Persian Tailoring Scissors
After making a precarious leap from a broken wooden beam onto a more solid platform you’ll go up some wooden stairs on the right and then around to another set of stairs. These ones have a crawl space underneath (it’s hard to miss). Guess where the treasure is?
/https://oimg.videogamer.com/images/f362/26_persian_tailoring.jpg)
Treasure in Chapter 9 of Uncharted 4
27. Lantern Mounted Flintlock
After the charming start to the area (feat. skeletons in gibbets) move into the next cave area and, just before the wooden bridge, drop down to the left. There’s a separate little alcove/cave here with your treasure.
/https://oimg.videogamer.com/images/8fa4/27_lantern_mounted.jpg)
/https://oimg.videogamer.com/images/823f/27_lantern_mounted1.jpg)
28. Strange Pendant
After solving the door puzzle with the three crosses and the bucket of water, go through and around to the left. If you look over the edge you can see a target for your grappling hook. Jump to grapple it, then turn and swing to an alcove that’s behind and above you. There’s a skeleton here with the pendant on it (which is a Firefly pendant from The Last of Us – Uncharted set in distant post-post-apocalyptic future, confirmed – with the name Druckley on it, presumably a portmanteau of Druckmann and Straley, the directors of both games).
/https://oimg.videogamer.com/images/38cc/28_strange_pendant.jpg)
29. Amatory Box
At the broken bridge with the crate puzzle on the right, turn and go to the rock edge opposite and slightly to the right of the bridge. You can climb down on some handholds here. Go down as far as you can and the treasure is on the far right corner of the bottom ledge.
/https://oimg.videogamer.com/images/4190/29_amatory_box.jpg)
30. Pewter Box
After the cutscene where you eavesdrop on Rafe and Nadine shuffle across the rest of the ledge and around to the next solid floor. Keep heading around and on the back wall is a doorway with a fallen statue. Squeeze under the statue to collect your lump of pewter.
/https://oimg.videogamer.com/images/f9cb/30_pewter_box.jpg)
31. Memento Mori Skull Watch
Once you’ve swung under a wall and pushed a crate down so you boys can climb up a ledge, go through and back around to the right, so you’re at the broken bridge and looking at where you just were (“I think that’s where we came from already”, spake Sam). There are some hand holds on the wall on the right, and you can climb down to another ledge which has the gross timekeeping device you’re looking for.
/https://oimg.videogamer.com/images/eb24/31_memento_mori_skull1.jpg)
/https://oimg.videogamer.com/images/d3db/31_memento_mori_skull.jpg)
32. Scottish Tipstaff
This is in the area where you use the rolling crate with grapple points on it to help both the brothers on their way past yet another broken bridge. Once you’ve used the crate to swing to the opposite side, jump over the crates and barrels behind it (before you’ve pushed it along). There’s a gap you can stand in, and the treasure is on the stand with a bowl on it. We don’t know what a Scottish tipstaff is but it’s probably slang for something horrible.
/https://oimg.videogamer.com/images/3c9a/32_scottish_tip_staff.jpg)
Treasure in Chapter 10 of Uncharted 4
33. Sawasa Ware Tobacco Box
Drive forwards from the start of the chapter, doing well cool donuts at your leisure, and you’ll come to a few ruined walls – Sully will point them out. Climb onto the remains of the upper floor to find the treasure.
/https://oimg.videogamer.com/images/47e0/33_sawsaware_tobacco_box.jpg)
34. Eroded Flintlock Pistol
At this point in the game Drake and Pals will have passed several flintlock pistols that aren’t eroded but apparently none of those counted as treasure. In the second area of the chapter follow the river upstream to the left until you reach the waterfall. Wouldn’t you know there’s a cave behind it? The treasure is on top of the platform, so use the moving crate on the left here to get up there.
/https://oimg.videogamer.com/images/12ef/34_eroded_flinklock_pistol.jpg)
35. Mughal Ivory Powder Flask
At Christopher Condent’s tower, where you have to winch the jeep up a mud slope for the first time, climb up from the ground floor and collect the treasure from what remains of the first floor.
/https://oimg.videogamer.com/images/58fb/35_mughal_ivory_powder.jpg)
36. Parchment Scroll
After you move into the next area from Condent’s tower the lads will pause and comment on the view of the volcano. Go straight down the hill and angle a little left. You’ll come upon some more ruins, although barely more than a couple of corners of wall are still standing. There’s a box on one side with the treasure on it.
/https://oimg.videogamer.com/images/1efa/36_parchment_scroll_1.jpg)
37. Ancient Fertility Idol
When you drop down the rocks into the next area the track loops around on your right. At the top of the loop is a big rock slab that the jeep can’t get over – but Drake can! Go over it into the little cave area and the treasure is on a box on the left.
/https://oimg.videogamer.com/images/55f5/37_ancient_fertility_idol.jpg)
38. Pocket Celestial Map
After taking out an absurd number of soldiers at the almost fully intact watchtower of Adam Baldridge, and making your way up and over the wooden bridge (which partially collapses, obviously), head into the next area. Follow the track to the left and you’ll find a solitary bit of ruined wall with a bit of roof clinging onto it. Climb up to collect your treasure.
/https://oimg.videogamer.com/images/fc5a/38_pocket_celestial_map.jpg)
39. English Ale Bottle
After our brave adventurers comment on all the Shoreline troops driving around on the volcano, go down and left until you find a squat, red building. One of the lads will say something along the lines of “Check out that old building” just incase you missed the old building. Use the jeep as a stepping stone to climb onto the roof, then shoot the TNT barrels to open the boarded up trapdoor. Drop inside the building to get the treasure.
/https://oimg.videogamer.com/images/342f/39_english_ale_bottle.jpg)
40. Pewter Letter Cylinder
Go all the way to the very right hand side of the area (without going up the hill in front) and you’ll find a well. You’ll know when you’ve found the well because Sam and Sully make much comment on the well. Take the winch and drop into it. You’ll need to go around the right side of the underground room and then attach the winch to the post opposite where you entered. Sully will floor the jeep backwards and you can use the fallen post to jump up to the ledge with the treasure.
/https://oimg.videogamer.com/images/eee3/40_pewter_letter_cylinder.jpg)
/https://oimg.videogamer.com/images/8958/40_pewter_letter_cylinder1.jpg)
41. Mughal Box
Back on the left side of this area is a hill which you can drive around in an upwards spiral to get to the ruins at the top. The start of the route you can drive is marked by two small stone posts, and there are more of them going around the hill. There’s a barrel in the corner of the ruins on top, which doesn’t have treasure on it.
Just kidding; it does.
/https://oimg.videogamer.com/images/929e/41_mughal_box.jpg)
42. English Musket Bandolier
Back on the right side of the map, up from the well that Sam and Sully were so excited about, is another ruin with some Shoreline guards, though there aren’t many on this one. You can get their either by going under a rock arch that looks like a miniature Pride Rock out of The Lion King or, to the left of that, going through an old tunnel. You’ll know when you’re close to either because Sully will point out some smoke. At the centre of the ruins is a boarded over kind of trap door with explodable barrels. Explode them to drop down into the hole and grab the treasure.
/https://oimg.videogamer.com/images/56e6/42_english_musket.jpg)
43. Antique Tea Tin
We’re on the left side of the area again for this one, round behind the hill where you found the Mughal Box. There’s another, more intact set of ruins with quite a few Shoreline guards around it. Take ’em out and then look for the red, square building with a door wired with dynamite. Follow the wires back to their plunger and hit it to blow the door to hell and get inside the room for your no doubt extremely valuable tea tin.
/https://oimg.videogamer.com/images/0f0c/43_antique_tea_tin.jpg)
44. Scottish Twopence Coin
After driving out of the area along a precarious cliff you’ll come to an almost intact tower: a smaller, signal one, rather than a full watch tower. Get out. The group will, once again, comment on the view. At the top of the tower, inside the empty brazier, is the coin. This will presumably be four times as valuable as the ha’penny you found in Scotland! Happy days.
/https://oimg.videogamer.com/images/bd1f/44_scottish_twopence_coin.jpg)
45. Scottish Snuff Mull
Once you’ve arrived at the big-ass main tower you’ve been aiming for the whole time, go up the stairs and then left, past the door you break down to actually get into the tower, and into the corner where there’s a group of crates and a bit of tat. Sorry, treasure. Not tat.
/https://oimg.videogamer.com/images/8adc/45_scottish_snuff_mull.jpg)
46. Brass and Ivory Tankard
After you’ve blown your way through the walled off doorway inside the main tower, and Sam has run down the spiral staircase like a giddy child, go to the shelf on the right hand wall of the main tower room. The tankard is right on the inner corner of it.
/https://oimg.videogamer.com/images/aaf3/46_brass_and_ivory_tankard.jpg)
47. Muff Pistol
We haven’t googled exactly what a muff pistol is, and we’re not going to. In the corner of the main room of Avery’s tower, before you go down the stairs, there’s a suspiciously neatly arranged trio of wooden boxes. Destroy them with dynamite to get the pistol.
/https://oimg.videogamer.com/images/a6a9/47_muff_pistol.jpg)
About the Author

Uncharted 4: A Thief’s End
-
UnknownUnknown
- Platform(s): PlayStation 4
- Genre(s): Action, Adventure, Shooter, Third Person