You can trust VideoGamer. Our team of gaming experts spend hours testing and reviewing the latest games, to ensure you're reading the most comprehensive guide possible. Rest assured, all imagery and advice is unique and original. Check out how we test and review games here
To Ascend your character in Path of Exile 2, you will have to undergo Trials of Ascendancy. The first one you’re going to find is set in Act 2, called Trial of the Sekhemas. This Trial involves navigating a roguelike dungeon filled with traps, rare enemies, puzzle-like challenges, and a final boss. Completing the trial successfully for the first time will let you pick out your Ascendancy Class, or otherwise, grant you Ascendancy Passive Skill points. We’ll walk you through the challenge in this guide, so you’ll be able to overcome the Trial.
How to start the Trial of the Sekhemas?
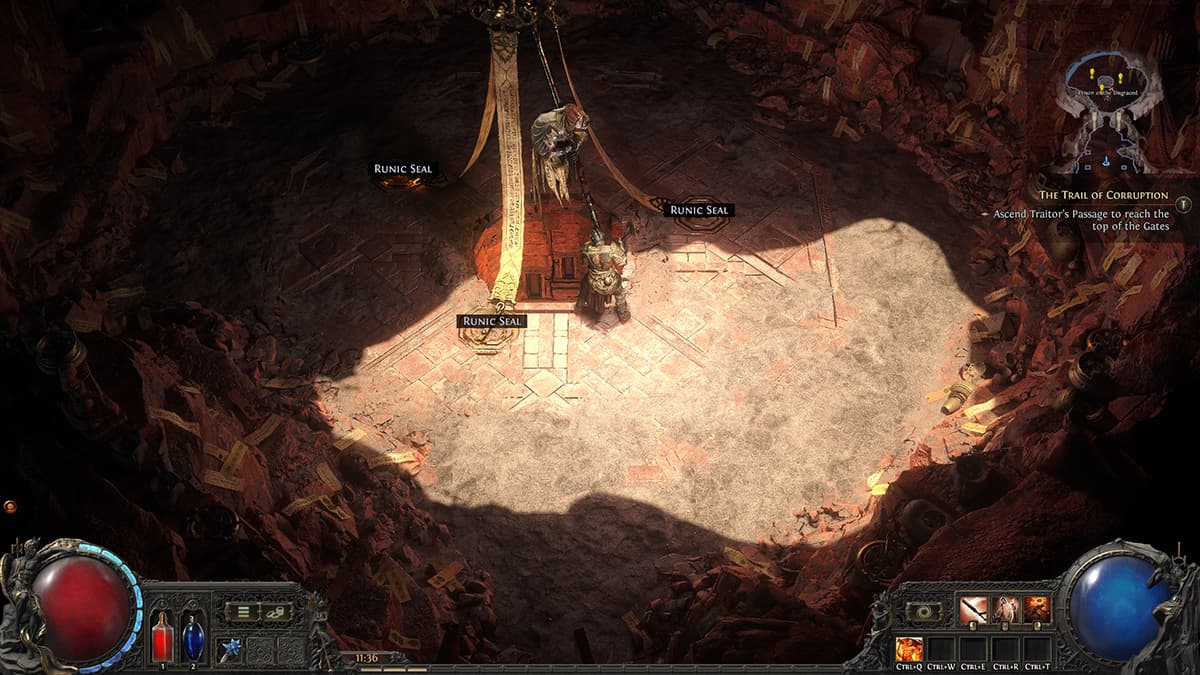
Disengage all three Runic Seals to free Balbala – just be ready for a boss fight. Captured by VideoGamer

Balbala’s Barya is not only a quest item, but likely the first Trial Key you’ll encounter. Captured by VideoGamer

Trial of the Sekhemas is available as early as Act 2. Captured by VideoGamer
To gain access to the Trial of the Sekhemas, you will first have to free and defeat the Djinn boss – Balbala, the Traitor. You can find her within the Traitor’s Passage, early in Act 2. She will drop an item called Balbala’s Barya. Take it to Zarka to begin the Ascendancy quest, Ascent to Power. Then, take the caravan to Trial of the Sekhemas once you’re ready to begin your ascension.
Trial of the Sekhemas – Basic concepts
The Trial of Sekhemas becomes available during Act 2 of Path of Exile 2. Each room of the roguelike dungeon presents a unique challenge, requiring you to overcome obstacles like avoiding traps, surviving waves of enemies, or completing time trials. Along the way, you will also have the chance to find boons and rewards that can aid in your survival, as well as debuffs and curses that can hinder it.
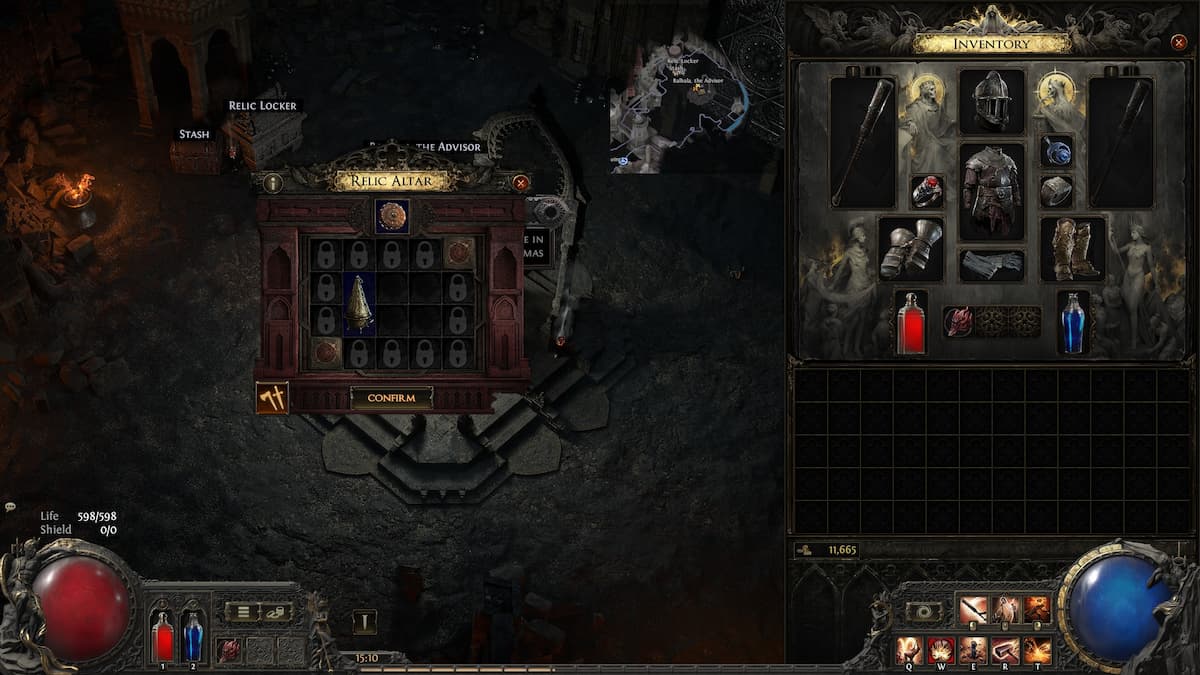
Relics
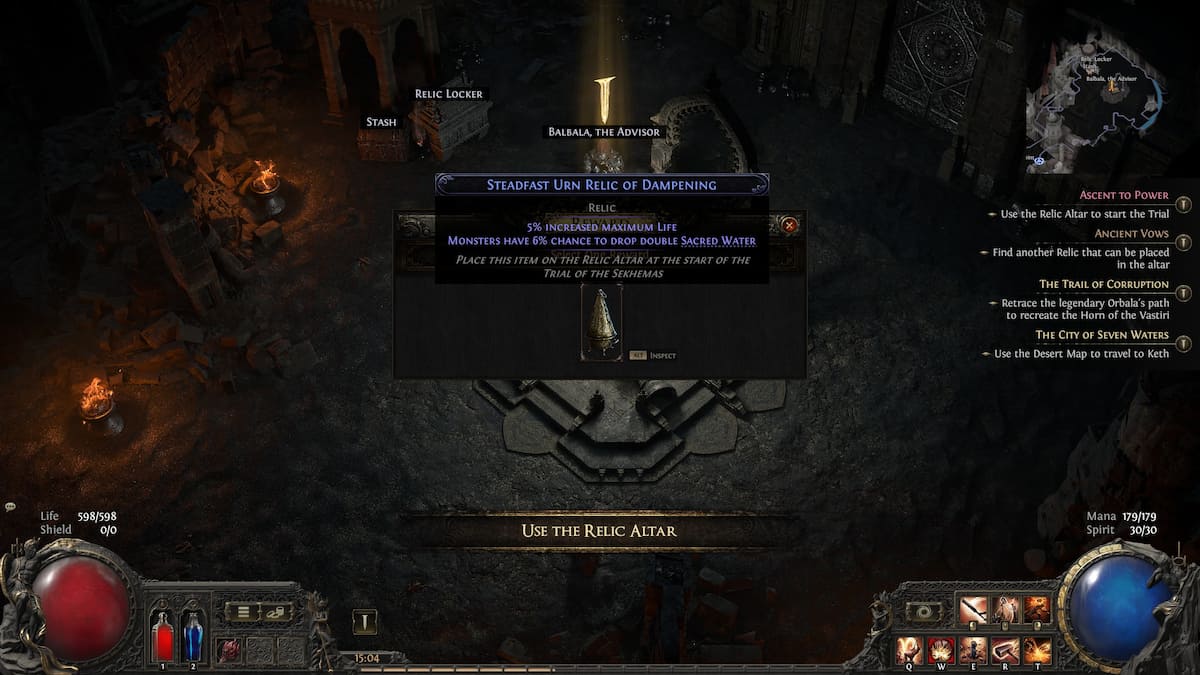
Before attempting the Trial of Sekhemas, you will receive a Relic, a special gear item that offers buffs specifically for the Trial attempt. Relics grant various advantages, such as increasing your health (which also boosts your Honour) or providing effects like Honour recovery. Relics can be further crafted using Orbs of Augmentation. Then, you can place them in the Relic Altar to boost your character before starting the Trial.
While Relics may not have a huge impact on your first attempt, they become increasingly important as you progress through the higher difficulties of the Trial, where tougher enemies and greater risks lurk. Acquiring better Relics through Merchant encounters or drops within the Trial will be vital for farming it later on, especially in the endgame.
Honour
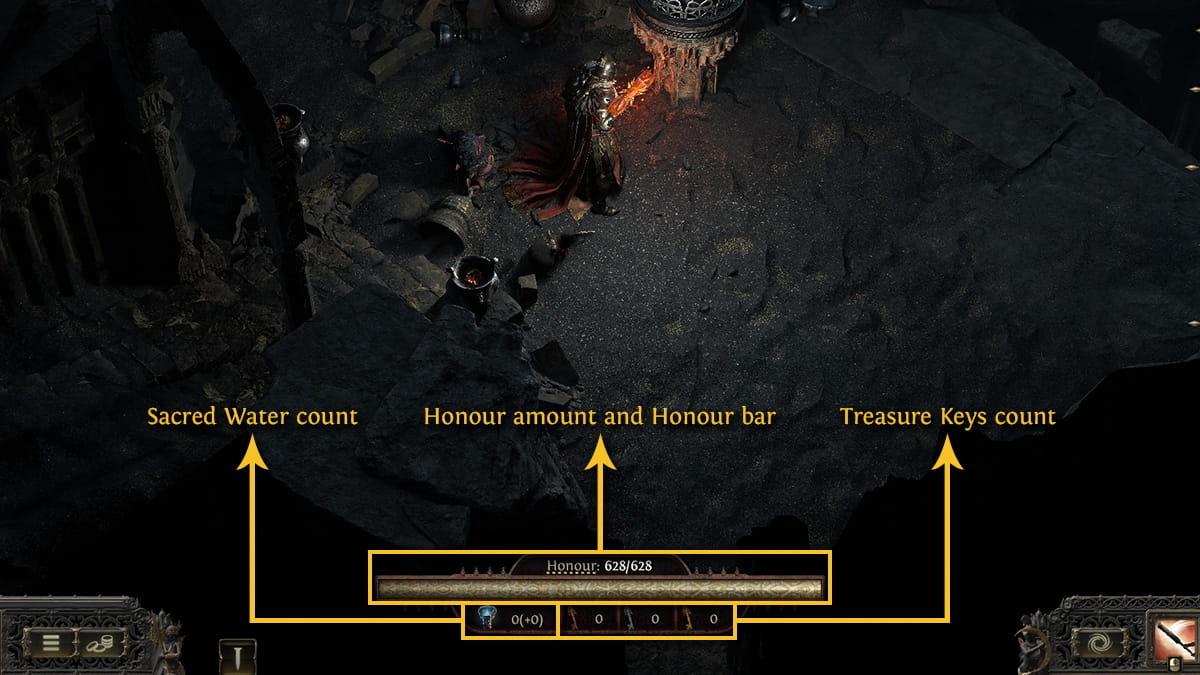
One of the most unique aspects of this Trial is the Honour mechanic. Honour is a separate health bar that represents your character’s total Life and Energy Shield combined, but it functions independently from both. Whenever you take damage to your Life or Energy Shield, you will also take damage to your Honour. If your Honour is depleted, you fail the Trial. You also fail if you die by conventional means, of course.
However, Honour cannot be healed by traditional means such as flasks, regeneration, or leeching. Instead, you can only recover Honour by finding the appropriate Artifacts, Boons, or Shrines within the Trial. Honour adds an additional layer of strategy to the Trial, requiring you to play carefully and avoid taking unnecessary risks. If your Honour is low, it may be best to avoid dangerous encounters and choose less risky paths, even if they don’t yield the best rewards.
Sacred Water
During the Trial, you’ll be able to collect Sacred Water from fountains, reward rooms, and sometimes as monster drops. This is a resource used to (rarely) power up some buffs, but primarily as a currency at the end of the run to buy extra rewards.
If you have any Sacred Water remaining after completing the Trial of the Sekhemas, you can spend it on additional Relics or convert it to Treasure Keys. Before doing so, be sure to talk to Balbala to see if she has any useful Relics you can buy to power up your next run. Once you’ve selected your Relics, you can convert any remaining Sacred Water into Treasure Keys at the Keth Forge. We recommend that you speak to Balbala before using the Keth Forge, as once you convert the Sacred Water into Treasure Keys, you won’t be able to spend it on Relics anymore.
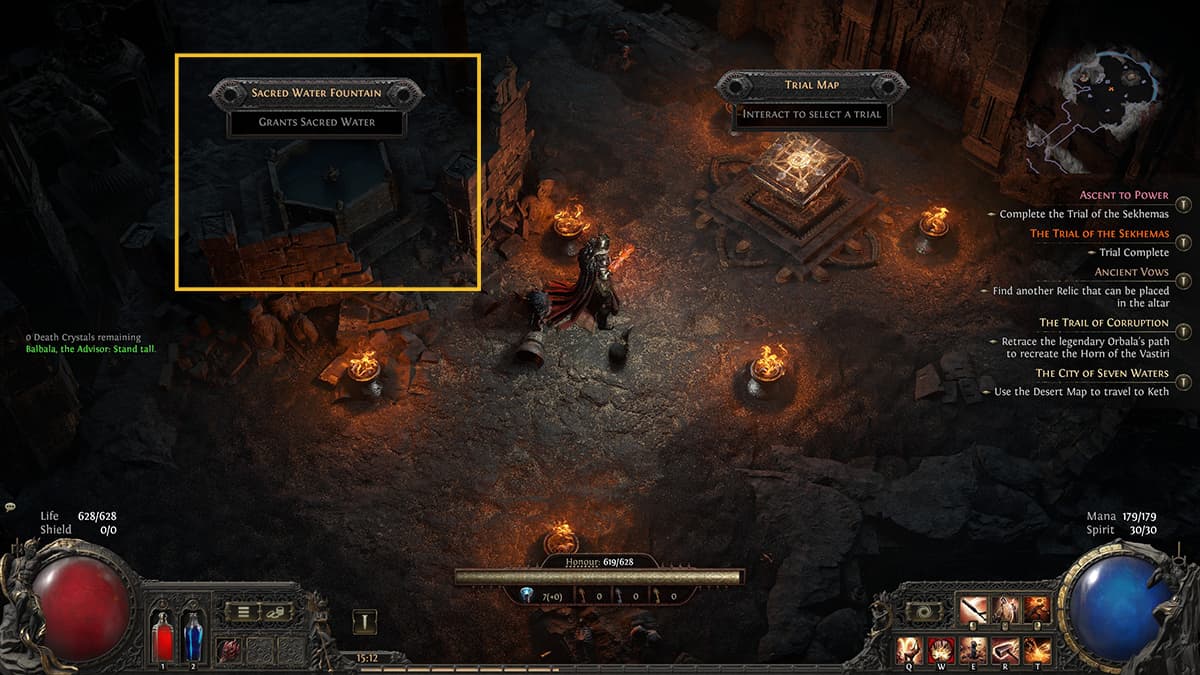
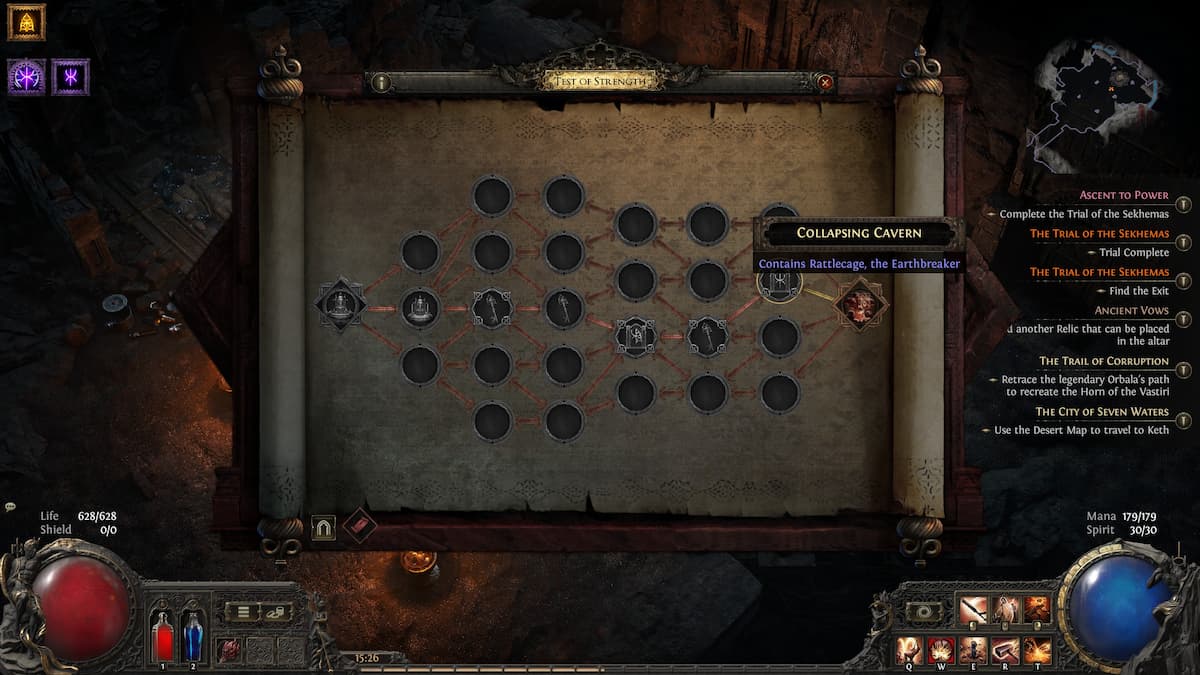
Trial Map
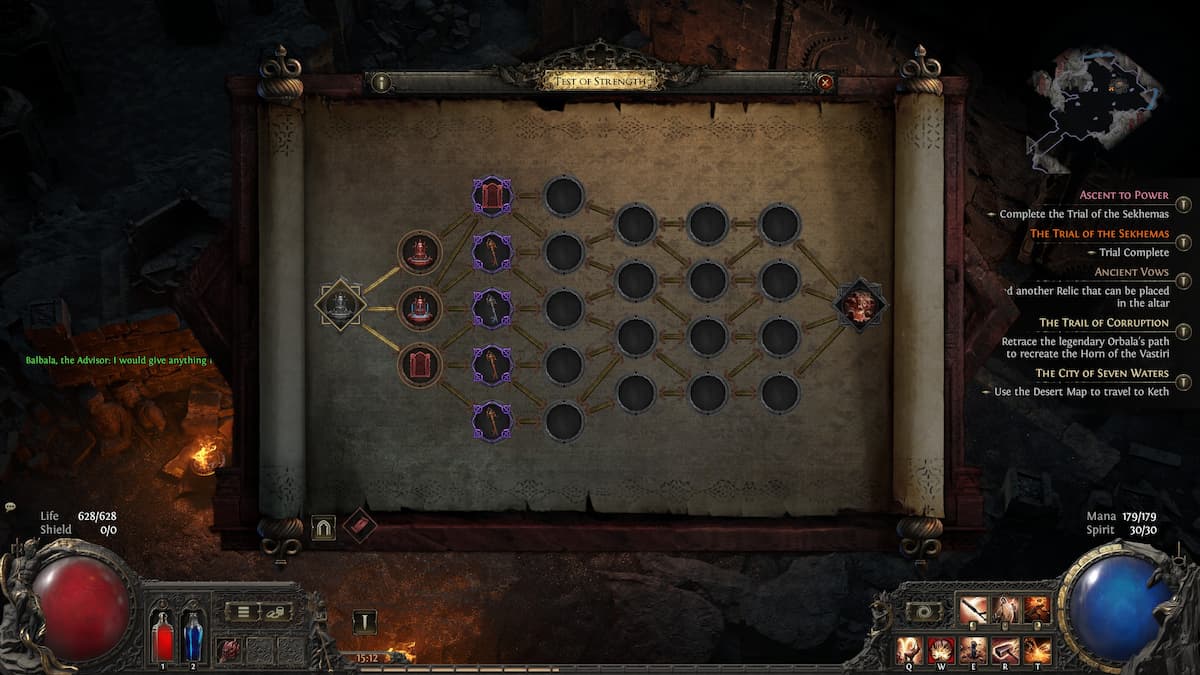
In the Trial of Sekhemas, the next two rooms ahead are marked on the map, which helps you plan your route. The map shows room types (such as traps or monster waves), rewards (like Honour-restoring wells or treasure keys), and afflictions (debuffs that affect you). Carefully managing these elements and making informed decisions while planning will bring you one step closer to success.
The goal is to begin from the far left room and make your way to the final one on the right side of the map, where the boss awaits. On higher difficulties, there are additional floors that expand the map, adding even more rooms and bosses. You can mouse over the revealed rooms to see what they’re like, before making a decision on where to go next. The rooms are connected by lines, so take note of what connects where.
You will start the Trial of the Sekhemas from a single starting room that branches into three others. Study the map on offer and pick the one you want to start with. Make sure to note which rooms your chosen room connects to as well. Weigh between the room type and the rewards you can get to make the optimal choice for your playstyle.
Room Types
Avoid traps at any cost, so you don’t lose Honour for nothing. Captured by VideoGamer
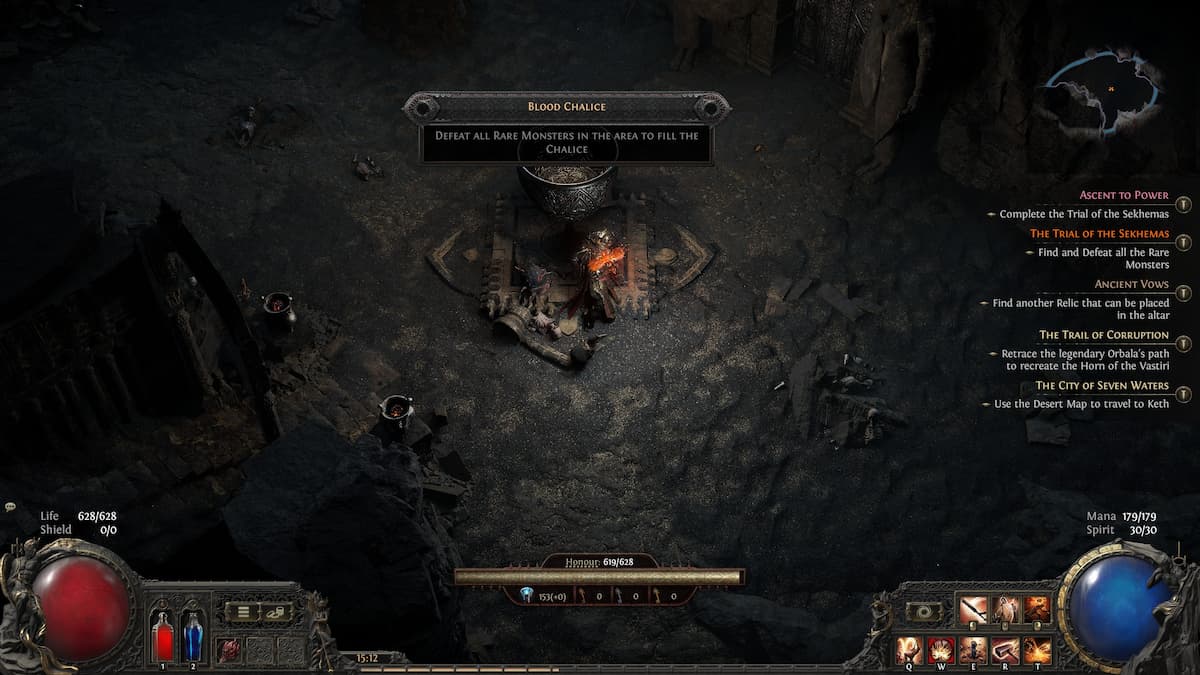
Activating the chalice will spawn Rare enemies in the area. Captured by VideoGamer
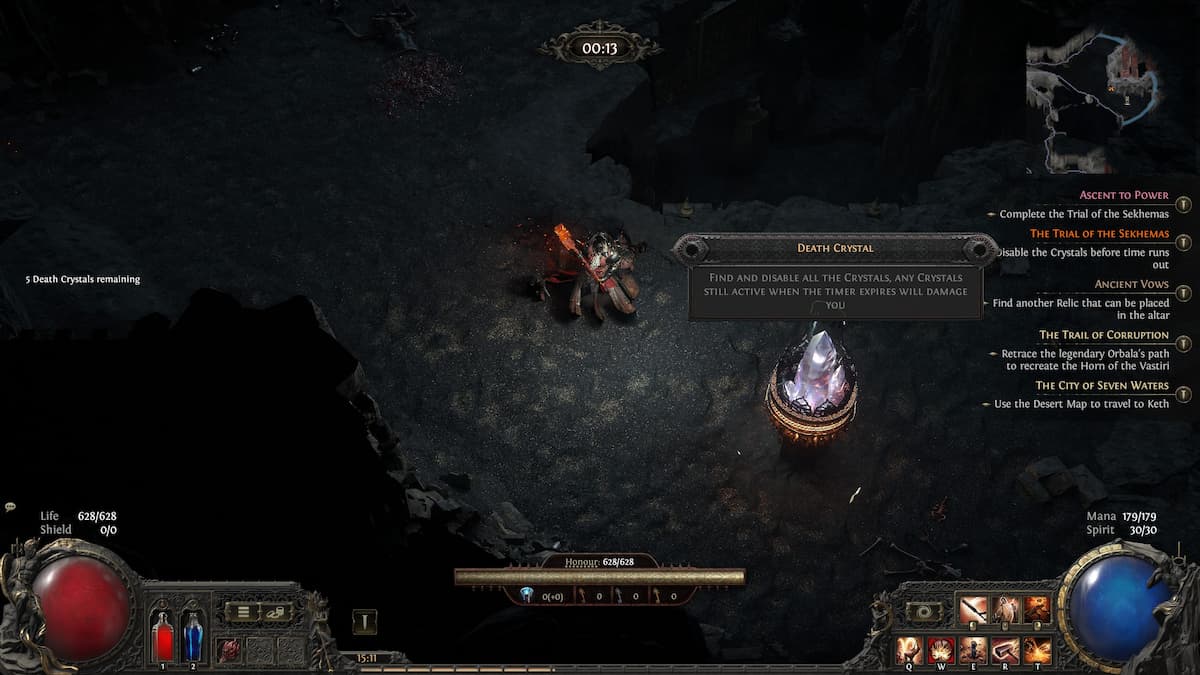
Quickly go from one to the next Death Crystal before time runs out. Captured by VideoGamer
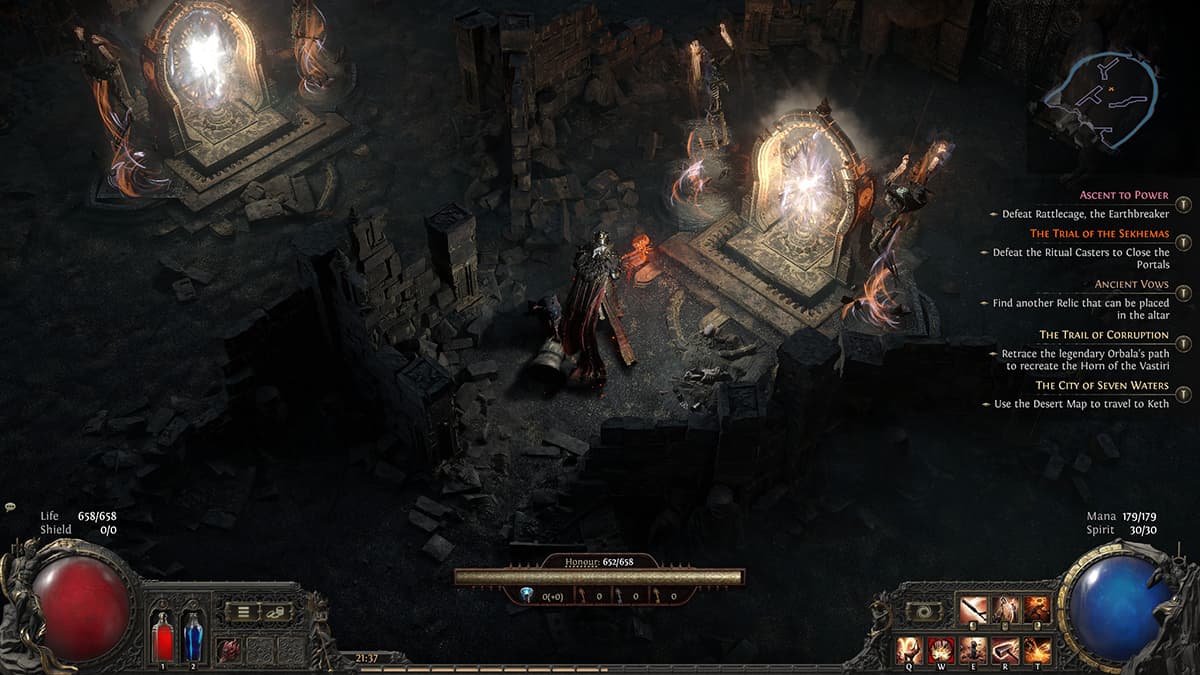
Kill the portal master mobs to shatter their mirrors. Captured by VideoGamer
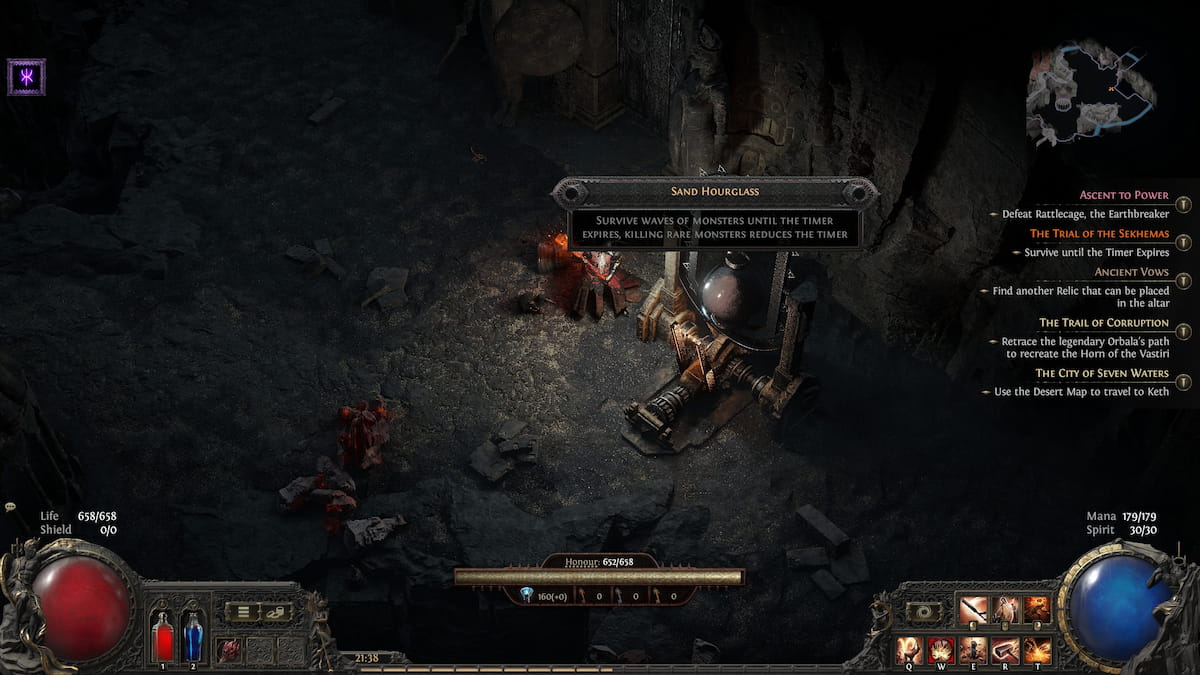
Click on the hourglass to begin the timed trial. Captured by VideoGamer
There are a few types of challenges found in the rooms during the Trial:
- Trap Gauntlet: The room is filled with traps and a few monsters. You have to reach the other end by avoiding traps and using levers to open the passages to the other side.
- Blood Chalice: After activating the chalice, Rare monsters will spawn in the area. Find and kill them to fill the chalice and proceed to the next room.
- Death Crystal: Activating the first Death Crystal starts a timer. You have to activate all Death Crystals before the time runs out. Each activation adds extra time and points to the location of the next nearest crystal.
- Mirror Trial: Monsters spawn from mirror portals. Kill the portal master mobs to close all portals and complete the trial.
- Hourglass Trial: Monsters spawn in waves. Evade and kill them until the time elapses. Killing elite monsters speeds up the countdown.
Room Rewards
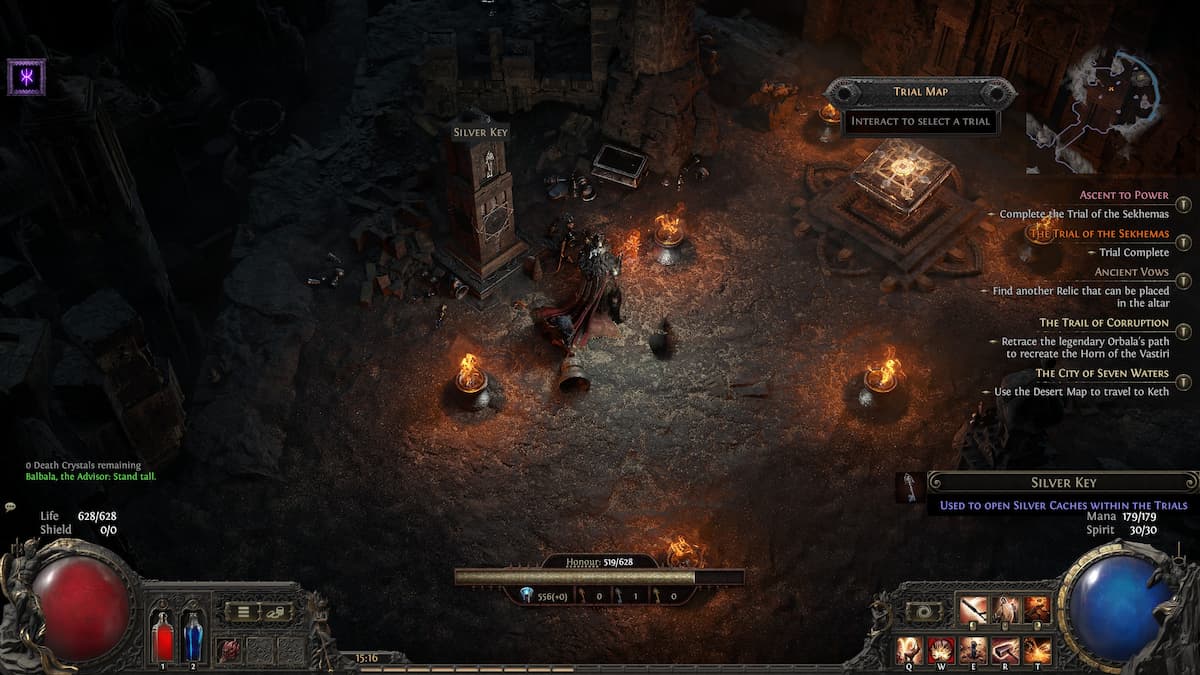
Rarer keys will get you more rewards if you beat the Trial. Captured by VideoGamer
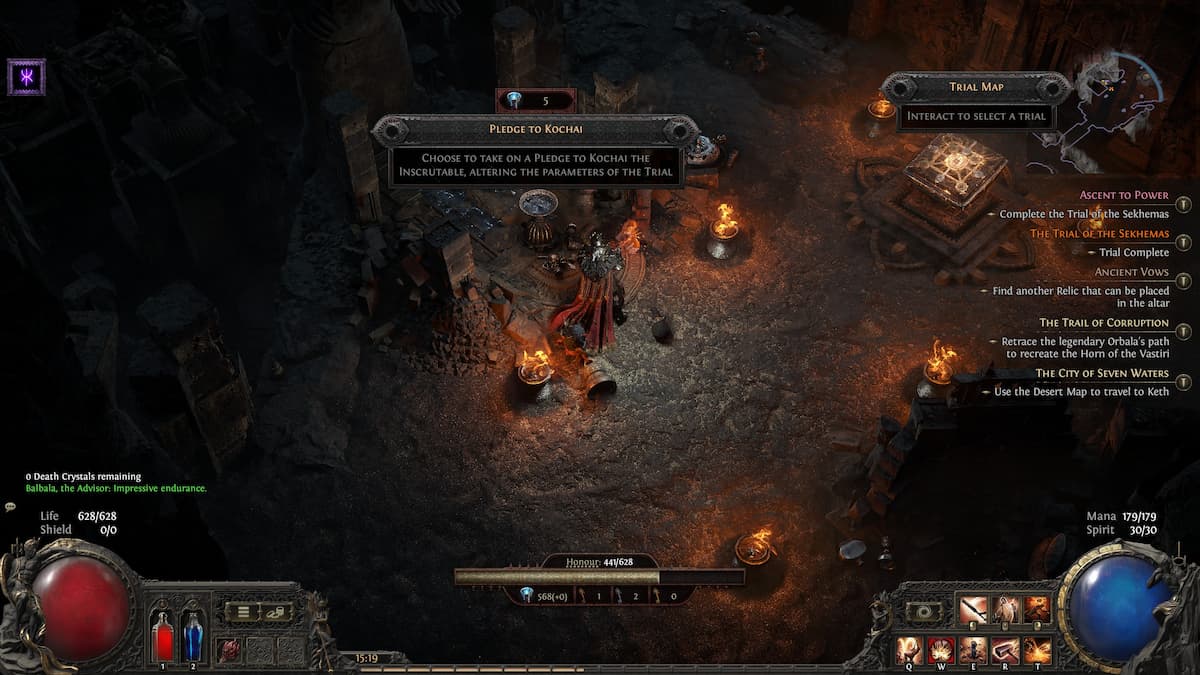
Pledging to Kochai can get you some powerful boons, at a cost. Captured by VideoGamer
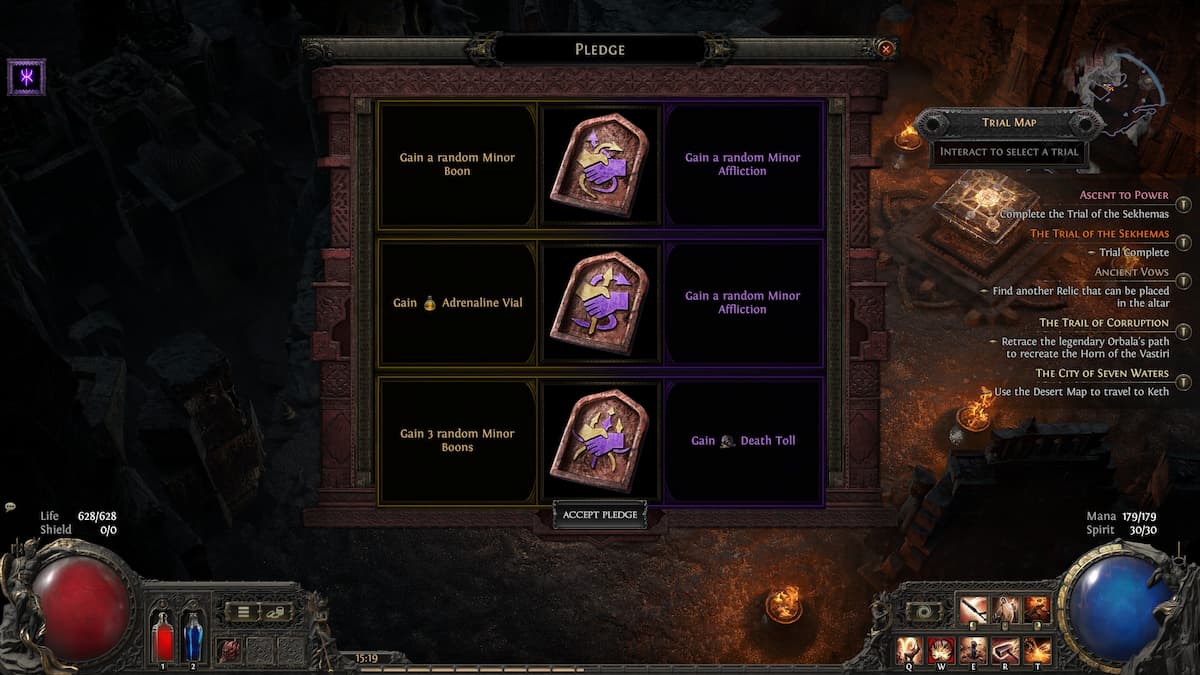
Just a few examples of what you can get by pledging. Captured by VideoGamer
Besides their dangers, Trial rooms will offer different types of rewards to pick from:
- Treasure Keys: You can get a Bronze, Silver, or Gold treasure key. You can use them to get extra rewards at the end of the Trial. However, if you fail the Trial, you lose all the gathered keys.
- Sacred Water: Use Large or Small fountains to get Sacred Water for your current Trial run.
- Merchant: You can find the Merchant encounter, where you can spend Sacred Water to buy Boons or Relics.
- Honour Shrine: Lets you use Sacred Water to recover a portion of Honour that you previously lost.
- Boon Shrine: Restores a little bit of Honour and grants you a random Boon.
- Pledge to Kohai: These Pledges have a tradeoff between Boons and Afflictions. You can select a Boon at the cost of an Affliction, remove a random Boon and Affliction, or gain a Random Boon and Affliction pair.
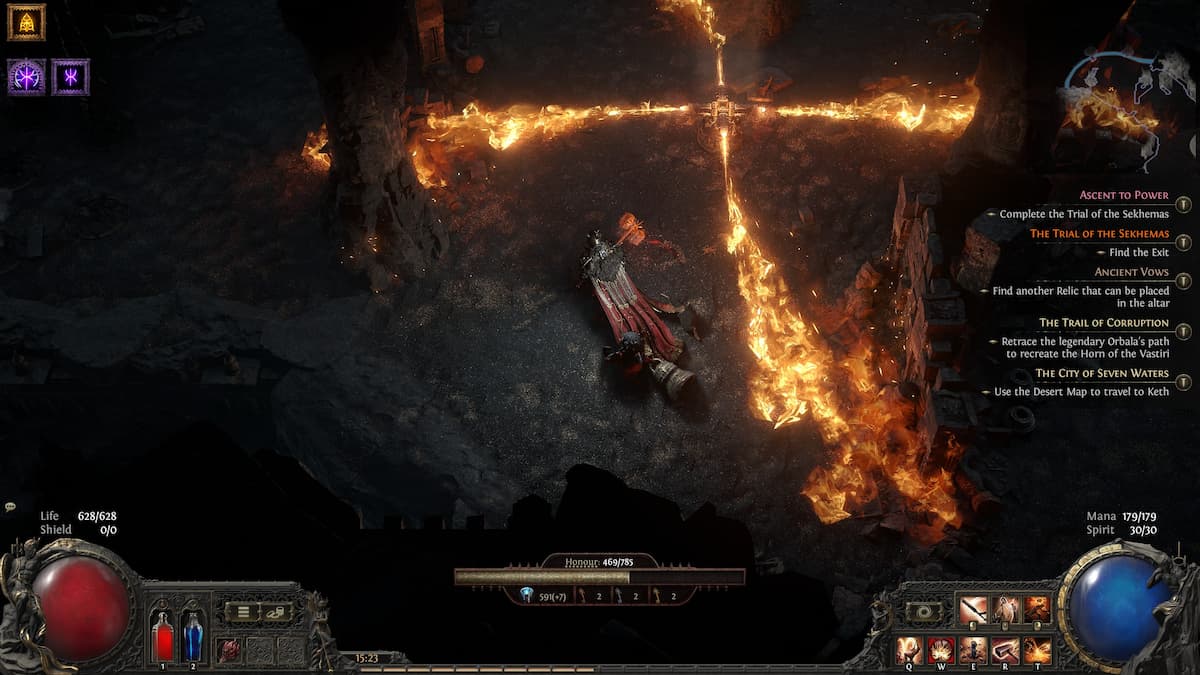
Trial Bosses
The final room on each floor of the Trial of the Sekhemas culminates in a boss fight. You must defeat the boss to proceed, or if it’s the final boss, to collect your rewards. These encounters can be some of the most challenging parts of the Trial, so ensure you have high Honour and any Boons that might help you succeed. If you manage to defeat the final boss, you’ll reach the reward room, where you can claim your Ascendancy Class and points, as well as use your keys and leftover Sacred Water.
Rattlecage, the Earthbreaker boss fight
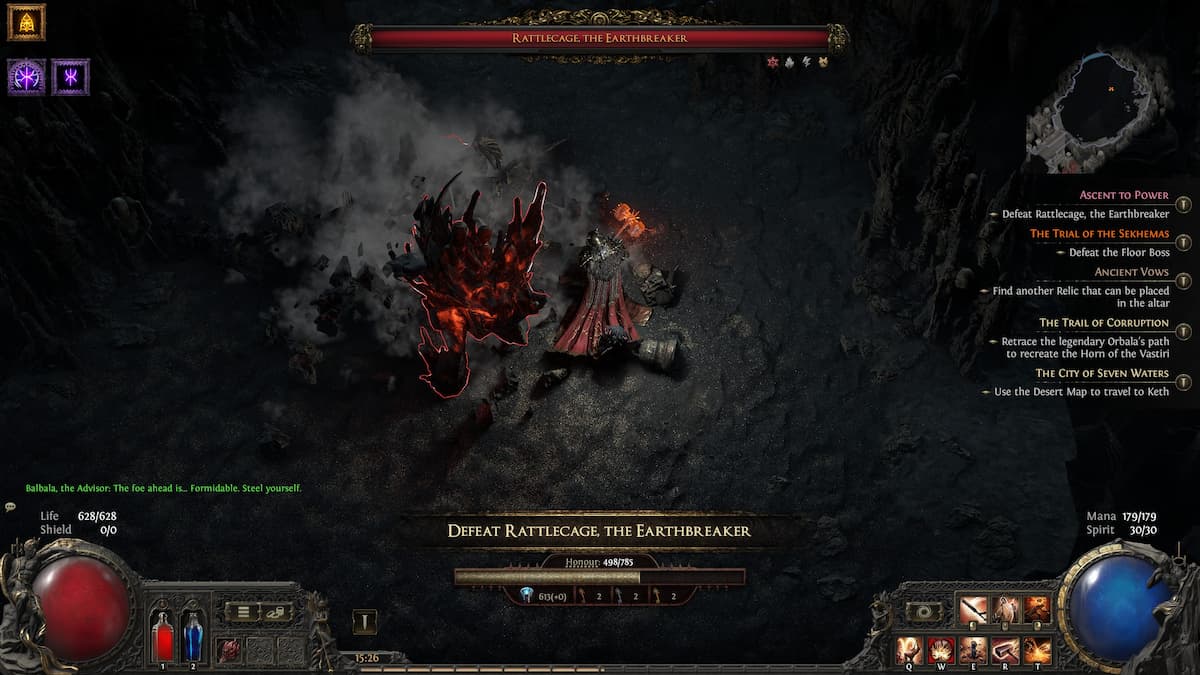
Rattlecage, the Earthbreaker appears at the end of the first floor of the Trial. This giant magma elemental can be a menace if you’re unprepared. He may be slow, attacking with large slams and lots of Fire damage, but he can also deny a lot of the area in the arena thanks to his other abilities. We have a few tips on how to beat him:
- Boost your Fire Resistance: Rattlecage mostly deals Fire damage. With that in mind, check the vendors for any Fire Resistance gear that you can use to mitigate it. Also, add a fire Charm to your belt, as it will temporarily improve your resistance as well.
- Boss’ Resistances: Rattlecage is resistant to Fire and Lightning damage. However, he’s vulnerable to Cold damage. In addition, Rattlecage has a fairly high Armour rating. That means that Physical damage will be less effective. You can use Armour Break skills to shred his armour, so your subsequent attacks deal more damage.
- Use Crowd Control: Crowd control Ailments like Stun, Freeze, and Electrocute can be very effective against this boss. Due to his Cold vulnerability, Freeze will be the easiest one to pull off.
- Telegraphed attacks: Rattlecage is big and slow, with big windups on his abilities. Take the time to dodge away, especially if you’re low on Honour. Besides, his area denial abilities can restrict your movement, so plan ahead on where you want to end up – ideally, nowhere near his next slam.
- Slam attacks: Rattlecage will slam the ground, dealing AoE damage. Roll away to avoid his attacks. A good tactic, if you’re melee, is to try to keep to his side and back.
- Fire Cracks: Rattlecage unleashes a snaking pattern after a slam. This creates lines that damage you when you cross them, effectively denying parts of the arena.
- Magma Nova: This attack is the most dangerous for melee classes. Rattlecage will channel the ability into the ground, making three concentric expanding explosions. Dodge away as fast as possible!
- Rain of Fire: When his life pool gets low, Rattlecage will use his slams to rain fire droplets from the ceiling randomly around the arena. They have a pretty long duration (about one minute), making this part of the fight very dangerous if you’re on low Honour. This final portion of the fight is critical – the arena will be flooded with dangerous spots, so you have to choose to either dodge and survive until the rain ends or to go all-out and try to finish off the boss.
Trial of the Sekhemas Rewards
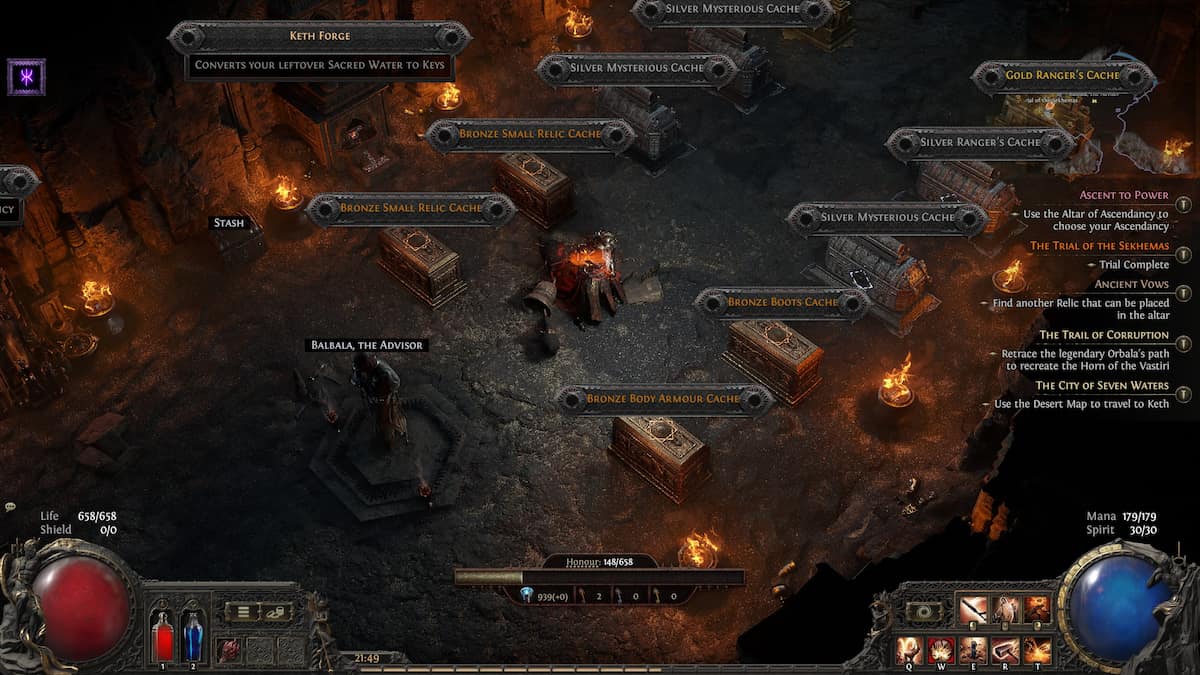
In addition to any loot you’ve picked up along the way (including boss loot), finishing the Trial leads you to the reward room. This is where you can complete your Ascendancy and claim Ascendancy Passive points. Moving on, you can also use Treasure Keys to open corresponding reward chests. The rarer the key type (bronze, silver, or gold), the more rewards you’ll get. Chests have names that denote the type of loot you can get:
| Chest name | Rewards |
|---|---|
| Relics | Drops Relics |
| Mysterious | Random loot rewards |
| Hoarder’s | Drops Currency and Gold |
| Armour | Drops only Armour gear, as well as Currency and Gold |
| Weapons | Drops only Weapons gear, as well as Currency and Gold |
| Gloves, Helmets, Boots, etc. | Drops the namesake item type |
| Royal | Drops Jewels (with a chance to get Time-Lost Jewels) |
Time-Lost Jewels are a loot type exclusive to the Trial of the Sekhemas. Normal Jewels can be a part of regular drops, but you have to complete the Trial to get these. When used, they provide a radius around the Jewel socket in your skill tree, modifying the surrounding passives. Lastly, you can spend your leftover Sacred Water on Relics and extra Keys.
This brings us to the end of the Trial of the Sekhemas guide. Make sure to check out our beginner’s tips and tricks for Path of Exile 2, as well as how to gain and use Spirit.
About the Author