You can trust VideoGamer. Our team of gaming experts spend hours testing and reviewing the latest games, to ensure you're reading the most comprehensive guide possible. Rest assured, all imagery and advice is unique and original. Check out how we test and review games here
From the bonfire in Majula, head towards the house with the tent just to the side of the building. To the right of the house is an archway with some stairs leading down to the sewers. Once you head down the stairs, there’s a lever to your left on the ledge – pull it to raise the gate. Drop down and proceed through the gate, to the left will be a fallen soldier, where you can grab a soul of the lost undead and broken thief sword.
/https://oimg.videogamer.com/images/55a0/heides_tower_entrance.jpg)
Go through the arch on the right and down the steps, you’ll be greeted with a welcoming “Heide’s Tower of Flame” text on your screen. At the bottom of the eroding steps will be the first enemy, a giant green statue-looking figure clutching a sword and shield. To the right of him are some stairs leading to the first bonfire. Sprint straight past the knight and rest at the bonfire. Fighting this foe immediately and losing means being kicked all the way back to Majula, so make sure you rest first.
/https://oimg.videogamer.com/images/c90c/heides_run_bonfire.jpg)
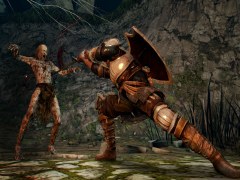
There are three different forms of these green knights; one with a sword and shield, one with a broadsword and one with a giant club. It takes similar strategies to beat each of the three, but you have to be mindful of the different attacks each use. The sword and shield soldiers are the easiest: keep circling, shield up, until the second of their three attacks, then attack until you’ve depleted your stamina (or use magic if a mage). Repeat until the knight falls. To the right of this enemy is a fallen soldier clutching the soul of a nameless soldier and a human effigy.
Head up the stairs and face the third old knight. Circle again, but beware of your surroundings. You’re fighting in a much smaller space, but if you’re worried about falling, lead the knight back down the stairs to a much safer fighting zone.
After the knight is down, a lever will rise from the ground that you need to pull in order to have a greater fighting area when you face the Dragonrider later. Proceed across the bridge towards the large chamber/arena, where three knights will be waiting for you.
If you’re using ranged weapons, this group can be easier to take down, but with melee you have to be patient. Luckily, there’s a trick. You want to only face one at a time – aggravating multiple knights will lead to an almost certain death.
The first one to fight you will be the middle knight; as you get closer to the entrance, slow your pace and walk. The middle knight will acknowledge your presence once you’re a few yards in and charge, while the other two will back off. Turn around and head back to where you fought the third knight, making sure the broadsword knight is following. Attack following his vertical strikes. There are two attacks you want to exploit: the first is the heavy vertical slice and the other is the double vertical attack. Don’t attack until after the second strike on latter move, as he has an attack which is one vertical strike followed by a horizontal sweep that can hit you even when you’re behind him.
Beware, as soon as he’s dead, the other two knights will come and fight you, even out here. The trick to beating these guys is simply to run away. Sprint as fast as you can towards the exit of Heide’s tower, back towards Majula and eventually both knights will retreat towards the cathedral again. Once they do, chase them down and attack the one closest to you. The second knight will head back into the cathedral and remain inactive, leaving you able to fight them one at a time.
After all three knights are down, turn right just by the entrance to the chamber and find another lever, pull this to give you an even larger fighting zone against the Dargonrider.
There are two exits, the one to the right leads to the Dragonrider and the end of Heide’s Tower, the left leads to the Tower of Blue and the Old Dragonslayer, as well as the one of the key early items: the Ring of Binding.
You should make a run to the Tower of Blue before fighting the Dragonrider, as the Ring of Binding will help you through most of the early parts of the game.
Don’t fight the Old Dragonslayer through the mist at the top of the Tower of Blue just yet, just get the ring then head back towards the Dragonrider. The Ring of Binding restricts the amount of health you lose when hollowed by half, allowing you to preserve Human Effigies.
/https://oimg.videogamer.com/images/cdcc/dark_souls_2_left_exit.jpg)
Outside the arena area with the three knights will be two more standing guard. Use the same strategy of provoking one then the other. The guy on the left will fight first. Once these two are down, head left before going up the stairs to grab the Divine Blessing.
At the top of the stairs will be another knight, but with the large fighting area, he’s easy to beat. His demise will cause another lever to rise from the ground, pull it to lower the drawbridge. At the top of the bridge is a fallen soldier holding an old radiant lifegem. But in the chest is the ring of binding and a human effigy. Equip the ring of binding immediately.
/https://oimg.videogamer.com/images/b7cc/dark_souls_2_right_exit.jpg)
Head back towards the hub where the three knights were and take the other exit. At the bottom of the stairs will be another knight with a broadsword, beat him and take the green blossom from the chest.
Proceed through the mist to face the Dragonrider boss. This opponent is very easy, as long as you’re patient. Circle towards his right hand, and keep attacking after he uses jabs and vertical slices. Make sure (if you’re using melee) that you only use two strikes for every attack, otherwise you’ll get caught with a counter.
After the Dragonrider is down, head up the stairs, light the bonfire and speak to Licia the Cleric if you want to buy miracles. There is an exit from this tower leading to No Man’s Wharf.
About the Author