You can trust VideoGamer. Our team of gaming experts spend hours testing and reviewing the latest games, to ensure you're reading the most comprehensive guide possible. Rest assured, all imagery and advice is unique and original. Check out how we test and review games here
Undead Settlement Bonfires
This is the second (or third, depending if you count the graveyard or not) area in the game, and it’s a little bit more dense than previous ones, and a bit grubbier, and there are dogs, and big dudes with saws, and people throwing things. It all seems unnecessary, frankly. This guide will break down where to find the bonfires, key items, and shortcuts in the Undead Settlement, as well as how to actually leave it and get to the next area. We’ve left the rest undocumented, so you can enjoy the magic of discovery for yourself (e.g. the discovery that there was a guy hiding in that doorway the whole time).
Undead Settlement bonfire in Dark Souls 3
You’re first dropped into the Undead Settlement at the foot of the High Wall, which spawns a bonfire there if you want to return to Firelink Shrine after killing Vordt. From there head down towards the big portcullis gate that you can see pretty directly in front of you. Once you get close enough it will trigger the gate to open, and a bunch of dogs will come through, but you should be more than capable of dealing with them. The other side of the portcullis is the real start of the Undead Settlement, and the first bonfire is in a shack in front of you and to the right. You should be able to see it from the portcullis. Make sure to explore the rest of the foot of the High Wall, though, to find Yoel (amongst other things).
Cliff Underside bonfire in Dark Souls 3
From the first bonfire, take the only new route available to you (which is forwards, through the building). You’ll very quickly reach one of the classic locations of the Undead Settlement, featuring in all good tourist brochures: the Burning Tree With Surrounding Mob of Mad Hollow Worshippers. These guys won’t aggro unless you run right up to them, so you can ignore them and head straight over the wooden bridge on the right, and through the barn on the other side of it (staying aware, because there are a couple of little ambushes). Get out of the barn and you’ll be in front of another bridge, this one smaller and made of stone. Instead of crossing it, go about halfway over and look down. You should see a ledge that you can drop onto from the bridge. Do this, and follow the ledge upwards. You’ll quickly get inside a little room – with the bonfire! If you go out of the doorway opposite where you came in you can get on top of some buildings to find Cornyx of the Great Swamp.
Dilapidated Bridge bonfire in Dark Souls 3
Alright, remember the burning tree mentioned above? Instead of going right, and over the bridge, you need to cross the square and keep going straight. You can still avoid the mob around the tree to get over there, if you hug the right side. Anyway, go through the doorway on the right (it’s the only path besides the aforementioned bridge you can take out of the square) and keep following the path through the half-falling down building (which, as ever, houses a few bad guys), dropping through an ceiling and fighting some sentient cages stuffed with corpses, until you come to turn a corner.
The path now leads down a hill between more buildings, but there are quite a few enemies a terrifying/jolly/terrifyingly jolly spellcaster to deal with who’s standing on a bridge between two buildings at the end, so you might want to just run through to get to the bonfire and deal with them later. Keep going until you’re clear of the buildings, then swing a right. You should find a small drop, as well as the bonfire and the dilapidated bridge in question.
Pit of Hollows bonfire in Dark Souls 3
Appears after you defeat the Curse-Rotted Greatwood.
The Undead Settlement shortcuts in Dark Souls 3
The Undead Settlement is a little more dense than the High Wall of Lothric, but there still aren’t many shortcuts to find.The easiest one opens up the sewers that run from the dilapidated bridge next to the Dilapidated Bridge bonfire, and that cuts off a huge loop that you now don’t have to run round. The easiest way to open it up is from the Cliff Underside bonfire. You can get out onto some thatched roofs from there, and should be able to see a rough flight of steps leading down on the left. Drop down from the roof and follow those steps down, then turn right and trace the line of the rocky wall next to you. Keeping the great big chasm in the ground on your left, you should run into a dog – and he’s right at the entrance to the sewers. Follow the sewers in a straight line, watching out for the giant rats (one of which is considerably more giant than the others) and you’ll be able to open the locked door to the dilapidated bridge.
Finding the giant and stopping the spears at the Undead Settlement in Dark Souls 3
As you progress from the Dilapidated Bridge bonfire you’ll shortly end up at a cliffside with a bunch of huge spears sticking up everywhere, and this is what we would call foreshadowing for what will shortly happen, although if you saw much preview stuff you’ll already know. Once you step out onto the cliffside then a giant on a tower opposite will start hurling more spears in the general direction of you and any of the trash mobs on the hill. You need to keep moving to get through, because they do damage over an area when they smash down.
The giant in question is reached more easily from the Cliff Underside bonfire. Go out onto the thatched roof from there, drop down and go down the stairs, and go right, towards the sewer entrance we’ve already described above. You should see a small bridge over the big chasm in the ground. Go over that, being mindful of the three heavy enemies on the other side, and keep heading straight through, between two houses and some walls of rock, and up a grassy slope. The tower is right in front of you, so trundle on inside to meet Siegward of Catarina, the Onion Knight 2.0, coming up in a lift. If you speak to him he’ll eventually complain that he’s trying to get to the top of the tower, but the lift will only go down. But it’s a trick elevator! Miyazaki, you sneaky bastard.
Get on the elevator to trigger it, then run off it before it starts going down. Wait for a minute and another lift platform will come down from above you. Get on that, and go straight up the stairs to find the giant, who is remarkably friendly and will agree to stop throwing his (seemingly inexhaustible supply of) spears at you.
Key items at the Undead Settlement in Dark Souls 3
Loretta’s Bone
Greirat wants you to find Loretta, but he’ll settle for proof that she was dead the whole time (and gets over it remarkably quickly, actually). To find Loretta’s bone go from the Undead Settlement bonfire and through into the first house. Instead of going all the way down the stairs go straight ahead and out onto the balcony, which overlooks the burning tree and mob of undead. You’ll see a wrapped up corpse hanging upside down out from said balcony, with an item orb glowing on it. This is Loretta, but you need to unceremoniously cut her down, then go down through the house and out in order to actually collect the bone.
Estus Shard
This one is easy to find but potentially hard to pick up. It’s on a corpse in front of the much mentioned burning tree/mob combo, but you can’t get it without pulling aggro from said mob, so be prepared to take them all out – including the plump, cackling spellcaster they have with them.
Warrior of Sunlight Covenant
From the burning tree look across and to the left. There’s an archway with a dark, rounded door. Open that door and you’ll be in a room with a lot of hanging bodies. In one corner there’s a hole in the floorboards. Drop down into a room with your lovely Sunbro covenant!
Mortician’s Ashes
This is a bit of Ubral Ash, otherwise known as “ash you can give to that creepy old lady at Firelink Shrine so she can sell you more stuff”. In this case, the Mortician’s Ashes will unlock the grave key that opens a door in the sewer and leads, in a roundabout way, to Irina of Carim.
To find the ash, start at the Dilapidated Bridge bonfire and head away from both the bridge and the settlement buildings, towards the big heavy looking guy with the wooden planks on his back. You’ll then be at the graveyard covered in spears mentioned previously in this guide, and getting the ash will be easier if you’ve already spoken to the giant re. his spear throwing, as also mentioned previously in this guide, because otherwise you’ll have to keep frantically moving.
Anyway, head forwards in a straight line towards a half collapsed hut, but don’t actually go into it. Swing round to the left and head in a big curve up and back, towards where you first entered the graveyard. There’s an item orb tucked behind a tree. That’s your Mortician’s Ashes.
Undead Bone Shard
These can be tossed into the bonfire at Firelink Shrine to increase the power of your Estus. The first one to find is here, in the graveyard detailed above. On the right hand side, near the end of the graveyard and out into the chasm, is a still-standing bit of masonry that forms a platform you can jump onto. The shard is on this. Don’t fall.
Pale Tongue
Pale Tongues are a gross, if not exactly key item, but we’ve chucked this one in because you need to collect one to trigger Leonhard appearing in the shrine again, and this is the earliest you can find one in the game. It’s also in a hidden area of the map.
From the tower with the giant, get on the lift back down and listen out for Siegward of Carim doing his lost-in-thought “Hmmm” noise, because around about there you should see a platform that you can jump to from the lift. It’s easier to do it when the lift is going back up than on the way down, so maybe ride the lift a couple of times until you’re confident you know when to jump (because falling from that height is an instant death).
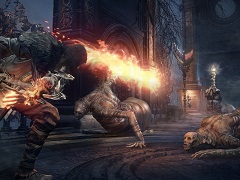
Go out of the windows there and you’ll find Siegward dangling his legs over the wall and contemplating the big flaming chap (flaming here to be read literally) smashing about in the town square area below. Once you run down to attack this guy Siegward will jump down to help you. The enemy is big and slow and Siegward can draw some of his attacks, so shouldn’t be too hard to take out if you dodge around well. Once he’s down Siegward will immediately and adorably fall asleep, and you can wander about the square. There’s a squat, pitched thatched roof roughly opposite where you enter the square, and it has a couple of hanging corpses with items on them hanging just over it. One of these is the pale tongue.
How to actually leave the Undead Settlement in Dark Souls 3
You may have noticed that until now the game has been comparatively easy to navigate, but it doesn’t signpost how to actually progress from the Undead Settlement into the next area. To do this, go to the trick elevator in the tower where you first met Siegward of Catarina and go down. There’s a Knight of the Boreal Valley there (basically a smaller, skinnier, and slightly faster version of Vordt), and once you’ve killed him you’re able to progress to the Road of Sacrifices.
Buy the official Dark Souls 3 Guide now.
About the Author