You can trust VideoGamer. Our team of gaming experts spend hours testing and reviewing the latest games, to ensure you're reading the most comprehensive guide possible. Rest assured, all imagery and advice is unique and original. Check out how we test and review games here
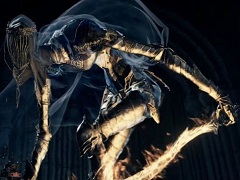
The Dancer of the Boreal Valley was one of the first bosses ever shown in the Dark Souls 3 preview and network test builds, but she shows up much later in the final game. The boss fight with the Dancer is eerie, and much slower paced than the other fights you’ve had – deceptively slow paced, in fact, as if to lure you into overstretching yourself and being too aggressive…
1. The Approach
Once you’ve killed your third Lord of Cinder (be that Yhorm the Giant or Aldrich, Devourer of Gods) you’ll be teleported back to the High Wall of Lothric in a cutscene, appearing back in the Cathedral where Emma the High Priestess first gave you the Small Lothric Banner. She’s collapsed on the floor in front of you, looking all frail and so on.
The fight with the Dancer won’t trigger until you speak to Emma and she dies right there on the floor, so if you’re not prepared for the fight, or if you want to explore back at Anor Londo more, then you can run back down to the Vordt of the Boreal Valley bonfire and fast travel around from there. As soon as you talk to Emma, though, you’ll get a cutscene where the Dancer drops ominously from the ceiling intent on cutting you up and creeping you out all in one. Her twin swords are imbued with fire and ash, but she starts with just the fire one so buff against that first. Luckily she doesn’t stack any effects on to you with her attacks.
2. The Dancer of the Boreal Valley’s first phase
This is one of the few fights that’s easier for a ranged or spellcaster build than for tanks or melee, since the Dancer moves at quite a leisurely pace, so you can get your shots off without worrying too much about her closing the gap. The Dancer is weak to lightning, (so cleric builds should do fine) as well as dark damage, so if you have any dark sorceries of pyromancies those are the ones to go for.
Whatever your class the key to this fight is not getting greedy. The Dancer will pace around steadily until she decides to attack, and you only have a small window of opportunity to move back if you’re up close to her. The lunges and spins she carries out are the main way she covers ground, as well as doing a lot of damage when they connect. Because the Dancer often chains attacks, using a shield too much can be dangerous as she’ll often break through the guard with at least one of them.
The Dancer’s main attacks are wide-angled horizontal slashes, sometimes full 360 degree spins, so it’s advisable to get in a few shots and then backing off to wait for her attack animations to finish. In the first phase the Dancer will try and grab you with her empty hand if you’re too close to it, and that results in a devastating attack, so stay as much on the other side of her as possible. She also has a couple of area of effect attacks to watch out for: a ball of flame she slams into the floor, and slicing her blade through the floor, the path of which is followed by flames. For melee builds running in and chaining maybe two attacks on her will be enough before you run back out again.
If you’re playing at range it’s much easier to avoid all of these, but if you’re too far removed the Dancer will sometimes close the gap with the good old jump-and-slam, so be prepared to roll with that one. You can use the pillars at either side of the hall as cover. The Dancer’s swords can still go through them (of course) but it’ll stop her spinning wildly around the room after you if she’s running into them, so you can control her position more.
3. The Dancer of the Boreal Valley’s second phase
After you whittle the Dancer down to half health she gets angry and produces a second sword from the ground, this one imbued with ash. When this happens you should back away to the opposite side of the room to her, because the first thing she does at this point is usually to dust off a massive attack that chains eight full 360 degree spins over a wide area. Get behind those pillars, if you can, to block some of her movement.
In this phase the Dancer can no longer grab you, because she has no free hands, but she is more aggressive and has more moves. She can now smash down or slash upwards directly in front of her, and has ash area of effect attacks as well as fire ones, so again, don’t be greedy. Go for fewer hits than you think you can get away with, not more, and you should be giving yourself to reposition and wait, watching for The Dancer’s attack and recovery cycles.
This fight isn’t as hard as some you’ve already had, but it can mince the unwary. As patient as the Dancer is, you must be more so. And then you can go to Lothric Castle.
Buy the official Dark Souls 3 Guide now.
About the Author