You can trust VideoGamer. Our team of gaming experts spend hours testing and reviewing the latest games, to ensure you're reading the most comprehensive guide possible. Rest assured, all imagery and advice is unique and original. Check out how we test and review games here
With the release of the new Alberta Hunting Preserve DLC we brushed off our snowshoes and hunted us some beaver!
SPONSORED POST
theHunter: Call of the Wild is the standard to which all other hunting games are measured against, and is generally regarded to be the best on the market, with a ‘Very Positive’ review rating on Steam. The latest Alberta Hunting Preserve DLC brings this brand new snowy Canadian region to the game, along with a host of new huntable animals, a new lever action rifle so you can feel like a real cowboy, and a story tied into the culture and traditions of the region.
For first time players, particularly those who know nothing about hunting (like moi), it can take you a short while to get to grips with the mechanics, and even longer to get good. So if you want to speed that process up we’ve compiled a list of 10 of the hottest tips to turn you into a Predator-level hunter in no time. These tips are as applicable to the base game as they are to the DLC, although there are a couple of unique quirks for the Alberta region that we’ve mentioned throughout.
The expansion focuses around the Askiy Ridge hunting preserve, which forms part of the lands of the Métis people: an indigenous group descended from a mix of First Nations people and the early Europeans settlers to Canada. With Janine Armstrong as your guide you’ll bag yourself some elusive beaver, (respectfully) mow down some Manitoban Elk, gaze in wonder at the aurora borealis, and try and prevent those gosh darn developers from ruining another piece of nature. Let’s dive in!


Discover all the lookout towers and outposts
The first thing you should do when starting on a new area is to travel around and discover all, or at least most of the lookout towers and outposts on the map, which requires you to walk up to them and press E. At outposts you can buy new equipment, take on challenges, and rest – which changes the time of the day. Once you’ve discovered them, you can fast travel between outposts using the map, enabling you to move around much quicker when after specific prey. Doing this is also a good way to get early XP. As a by-product of this process you’re also likely to come across many ‘need zones’ where specific animals congregate (more on this later), which will be marked on the map also.
Probably the most enjoyable way to do this is in conjunction with completing story-based missions, which will take you to most areas of the map at some point, and you can hunt along the way. Each map you play on has a unique story which interweaves the local history and culture of the area. In Askiy Ridge, Janine has you helping her drum up support for the hunting reserve, in an attempt to prevent the building of a ski resort which will ruin the local environment. Along the way you’ll investigate shacks flattened by beaver-felled trees, and she’ll tell you a bit about the local history and legends, including the elusive sasquatch (we haven’t seen it yet sadly).
If you have the DLC with the 4×4 ATV quad bike vehicle, this process can be a lot quicker if you’re in a rush, although you’re likely to miss the aforementioned need zones if you do this; alternatively, just take your time, enjoy the scenery, and hunt as you go!
Picking the right weapons & ammo
Before heading out on a hunt, head to the storage locker at your lodge and make sure that you have the weapons you want – you’ll need to drag them from the locker into your inventory along with the corresponding ammunition to match that weapon. New guns and ammo can be bought from the store with your hard earned cash, although you’ll have to become more proficient in the ‘score’ level of each weapon type in order to unlock the more advanced rounds and guns.
Matching the gun and ammunition to the animal types you’re aiming to hunt is very important: you won’t get very far plinking off some .22 bullets into the thick hide of a moose, and equally blowing away a rabbit with some hollow point magnum rounds will ruin your trophy. Animals are rated Class 1-9, with 9 requiring the largest caliber weaponry. You can discover an animal class by looking at it through your binoculars (or consulting online wikis) and then checking whether the ammunition/gun is suitable when you’re buying it (they usually cover a range of classes).
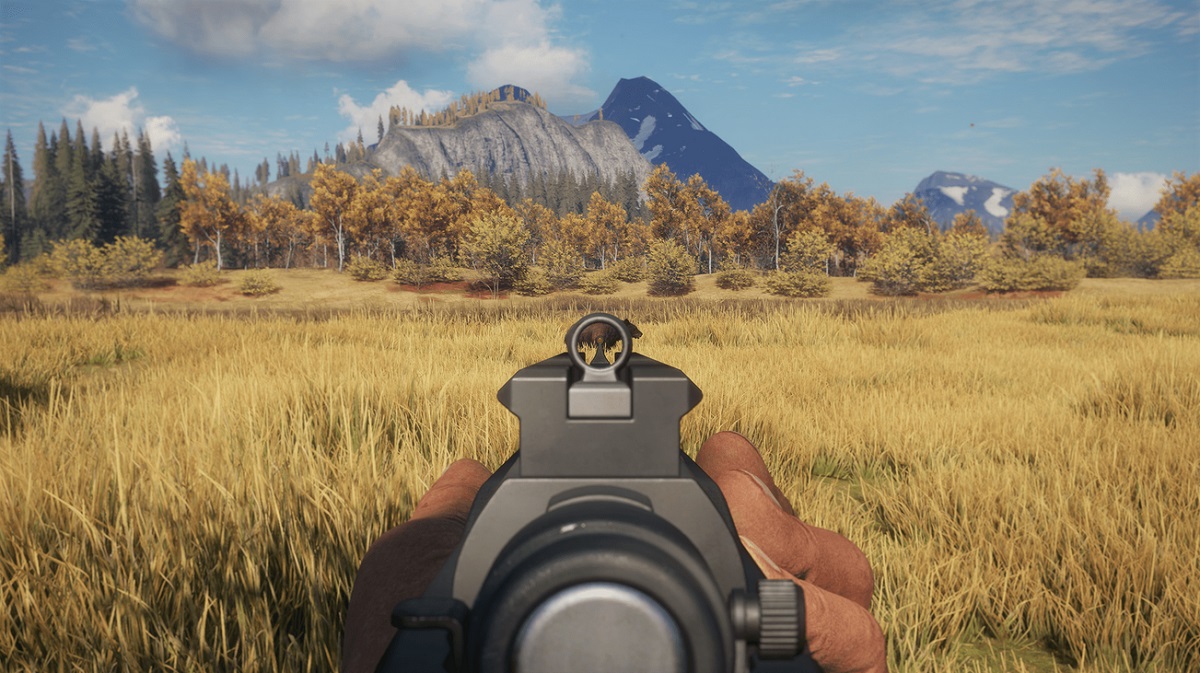
The Laperrier Outrider is the new .30-30 lever action rifle that comes with the Alberta DLC. With an effective range of 75m, you’ll need to get close, but animals in classes 2-6 should go down in one clean hit. I’d recommend trying it with the Iron Sights as you can be quick and stable with your shots though the gun does support a wide variety of scopes.
You can carry as many weapons as your carrying capacity will allow. Increasing your carry weight up to your carrying capacity threshold has no detrimental effects as you cannot exceed. You can however buy backpacks to increase your carrying capacity, though these do have negative effects: increasing your visibility and noise. Make sure if you change your loadout that you then go into the main menu and assign each weapon to a hotkey (1-0) so you can switch between them.
Finding the animals

Starting out, the best way to find the various animals in the wilderness is to listen out for their calls, orient your mouse towards them, and press E to identify them. If it’s a beast you’re interested in, walk in that direction (don’t run unless they’re very far, else you’ll cause them to scarper) and see if you can find some tracks. Some animals are pretty quiet, so you’re better starting off this process by finding their tracks or droppings in the first instance.
If you think you can see movement in the distance, getting out your binoculars (press ‘4’ as default), zooming in (with the mouse wheel), and then pressing E will give you the lowdown on any huntable creature of the wild – the type of animal, its demeanour (how calm it is), the class rating, and its distance away from you to help you get a range on your gun.
In your wanderings you may come across a patch of disturbed grass or other signs which indicate a ‘Rest Zone’ for a particular species, which will be marked on your map when you discover it. Alternatively, you may find a spot where animals come to drink or eat, perhaps whilst observing them through your binoculars whilst next to a lake or river. Collectively these are known as ‘need zones’, as mentioned earlier, and are where you can expect that particular type of animal to return to within a specified time window (although there’s no guaranteeing exactly when within that window they will show). You can use the rest function at your lodge/tent to skip ahead to nearer this time window if you wish to lie in wait for a particular animal.
Various lures can also be used to bring the animals to you. You start with a couple of these (like the duck caller) but most will require purchasing from the store. These include sound-based callers, scent sprays, food bait, and decoys.

The Askiy Ridge Reserve has 19 animal species in total, seven of which are brand new with this DLC. The most notable new addition is the North American Beaver, which can be found by seeking out the dams they build on watercourses. Apparently they can also cause trees to fall, which can land right on you and take you out, though we didn’t witness this in our playthrough (sadly).
Correct shooting
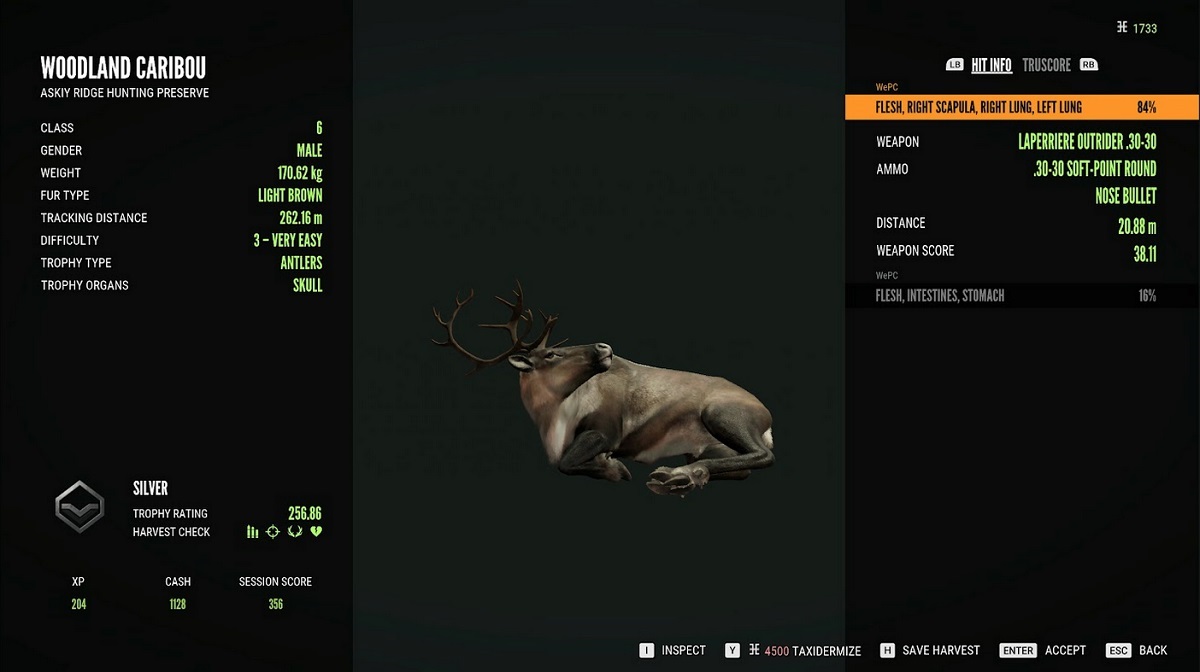
The ideal shot to kill the vast majority of animals in the game is a single shot through the heart and lungs, via the side of the animal. This will have a positive impact in terms of the score you get, the price the trophy will fetch for, and hopefully ensure a quick death, limiting the amount of time you have to spend tracking down the wounded beast (which can take a long time!).
When you approach the carcass and select it, the ‘Harvest Check’ will score your attempt, and you get a ‘trophy rating’ depending on how clean your kill is (rated bronze, silver, gold etc.). Different animals have different ‘trophy organs’ that you’ll want to avoid shooting to earn more money. The more shots you use to take down an animal will also count against the amount of money you can earn, as it causes further damage to the carcass, as will using the wrong ammunition.
Your stance (stood, crouched, prone) affects the amount of weapon sway / crosshair wobble when you’re lining up a shot, as does heart rate which is visible in the bottom right, which goes up when you run. You can hold your breath for a short period before your shot to temporarily reduce sway further.
Each gun and ammunition type have different velocities that determine the amount of bullet drop they experience. Wind can also affect the trajectory of your shot slightly, more so if you’re using a bow. Without unlocking zeroing, most rifles are ranged to 150 metres as standard.
Typically, if your target is slightly further away or closer than this distance, you will have to compensate by adjusting your crosshairs slightly below or above the target, which requires practise with the various weapons to get right. Spending time at the shooting ranges located in the Hirschfelden (for guns) and Parque Fernando (for bows) is a good way to get your eye in.
To make things easier, once you unlock the ‘zeroing’ perk (and all the levels of it), you can alternate between your crosshairs being calibrated for 75 metres, 150 metres, or 300 metres – this means putting the animal directly in your crosshairs at any of these distances with the gun zeroed correctly should guarantee an accurate shot, with no adjustments necessary.
Tracking without spooking your quarry
We’ve already mentioned how running is rarely a good idea, but there are various other things you need to consider if you don’t want your prey running for the hills.
Keep an eye on your noise meter in the bottom right. On soft terrain like grass, walking upright typically causes three white noise bars, crouch-walking one, and fast-crouching (by holding down shift whilst crouching) two. Sprinting by holding down shit whilst walking knocks your noise bars up past the three white, into one red. Walking on harder terrain (like rocky scree) can increase your noise level by an additional one. If you’re following tracks that suggest the animal is running, your best bet is to walk after them until you see that they’ve slowed to a trot/walk, at which point you can fast-crouch until you spot them, and then it’s probably a good idea to crouch walk or even prone crawl into position before you pull the trigger.
Staying downwind is very important, as animals will be able to smell you from some distance; although you can use the scent eliminator item to help you mask your smell a bit, it’s not 100% effective.
As soon as you pull the trigger on a firearm, animals will scatter and run to get away as fast as possible, so you’ll need to be quick with any follow-up shots. If you wound but do not kill an animal, you can follow the blood trail it leaves along with the tracks to find it again, although depending on the severity of the wound the bleeding may stop after a short while.
Minimizing hunting pressure
Hunting pressure represents the wariness of animals to return to an area, typically a need zone, after you have made various kills there. It is shown via a purple blotch on the map, which fades away over time, although if you continue to hunt in that location before this occurs then the need zone will eventually be removed completely and the animals will not return – instead setting up a new area.
It is advisable to limit your number of kills to three or at most four before moving onto a different area to prevent this from happening. You can reduce the build up of hunting pressure by shooting from blinds or stands or by using a bow.
How to progress
Most of the progression in the game revolves around increasing your money, which enables you to buy new gear, and increasing your XP, which is what levels you up, giving you skill and perk points that you can spend to improve your abilities. Completing story missions, discovering new lookout points and outposts, and taking part in challenges are a good way to increase your XP. There are also collectables like antler sheds and historical artifacts spread across the map which will give you XP. Maximizing your trophy rating by getting clean kills with the right ammo gives you more money per kill.
The third element of progression is your weapon score, which is increased through successfully using a weapon type (e.g. a rifle) to hunt and harvest an animal; a higher weapon score unlocks more guns, ammo types, and attachments that you can buy in the store.
The major objective of most hunters is to get clean kills on ‘rare’ and ‘diamond’ level animals, which often have unusual fur patterns or markings which makes them particularly valuable (albino or piebald animals, for example), but are particularly hard to find and difficult to hunt, especially the diamond level.
Skills & Perks
From Level 1-37 you will receive a skill point, and then a perk point, alternating with each level you gain. After Level 37 this reduces to one gained every 3 levels you advance, up until the max level: Lvl 60). These can be spent in the main menu to make you a better hunter in various different ways, depending on your priorities, though there are some which are particularly beneficial earlier on.
‘Zeroing’ is one skill that we’ve already mentioned which you should unlock as soon as possible. ‘Soft Feet’ is another good one which will make your footsteps quieter, ‘Spotting Knowledge’’ gives you more info when you spy an animal through your binoculars, and ‘Steady Hands’ decreases wobble when aiming. Ultimately though it’s down to you which Skills and Perks you prioritize, based on your preferred playstyle.
Your loyal companion

Once you’ve sunk a bit of time into the game, you may wish to add an extra dimension to your experience: getting yourself a trusty hunting dawg! These can be ‘equipped’ from any hunting lodge or tent assuming you have the right version of the game or the correct DLC. They won’t make or break your hunting prowess, but can make certain hunts more convenient plus give you a nice new bit of progression.
There are three breeds available at the present time: Labrador Retriever, Bloodhound, and German Pointer, each with their own specialisation. The Labrador can retrieve birds or rabbits you’ve killed to save you the bother, allowing you to focus on your next shot, the Bloodhound is the best at tracking down wounded animals by getting the scent from their blood, and the Pointer will sniff out prey animals and ‘point’ in their direction by extending its neck and body and raising up one of its paws.
You can see the full list of dog commands in the controls section of the menu. Successfully using your dog gives it experience points that will upgrade its skills and make it more obedient. You can also customize your dog with various different cosmetic accessories.
Take on Challenges
For the longer-term player, there are also various challenges you can try and complete, which involve using different weapons to kill certain animals, in a certain number, in specific ways. There’s also somewhat random challenges like ‘Truffle Pig’ which require you to find five mushrooms over the course of one hunt. Completing a challenge earns you a little medal and bragging rights around the lodge.
Buy the Alberta Hunting Preserve DLC on Steam Now!
As of the 17th June, 2025, the Alberta Hunting Preserve DLC is now available to buy on Steam. Hone your hunting skills amid the snowy peaks and pine forests of Canada now!