
Video Gamer is reader-supported. When you buy through links on our site, we may earn an affiliate commission. Prices subject to change. Learn more
What are Star Cards in Star Wars Battlefront?
Star Cards are items which can be unlocked and purchased to equip in multiplayer matches. Some are one-time purchases which can be used as many times as you like (after their respective cooldowns) like Thermal Detonators and Cycler Rifles, while others when unlocked have a finite amount of charges, like the Ion Shot.
These charges can be picked up in multiplayer maps – keep an eye out for an item that looks like a lightning bolt – or you can purchases batches of charges with the currency you earn in-game after each round.
Once these cards are purchased, you can equip them in-game. Cards with the square-shaped symbols can be attached to L1/R1, or LB/RB, while the golden cards (the ones which have charges, are activated with Triangle/Y.
Always pay attention to the map
The minimap in Battlefront displays every key piece of information you could want. Enemy location is shown at all times, pickups and objectives are clearly noted here as well as the HUD, too, so always glance down and check where you should be heading next. The Drop Zone map – Sullust – includes pretty rocky terrain and plenty of objects which can obscure the line of sight, making the map even more necessary.
Stick with Drop Zone for an hour or so
The game recommends that you level up a little before jumping into Walker Assault, though it remains pretty vague on exactly how tanked up you should be before jumping into the 40-player mode. Ideally, you should at least have earned enough credits to have unlocked the Ion Shot card, Cycler Rifle card and A280C primary weapon, as it has a longer range.
Because of the size of the Hoth map, the more advanced primary weapon will serve you better, while the Ion Shot is essential as a Rebel to take down the AT-ATs. The Cycler Rifle can be a one-hit kill from long range with a headshot, and with its low cooldown time, is well worth having.
Bullets are a bit slower than you might expect
The laser rifles’ ammo in Star Wars Battlefront travels a little slower than you might expect, so take this into account when shooting at range, especially on Walker Assault. Try to lead your target and anticipate their movement, meaning more of your shots will hit and take out the enemy quickly.
Active Cooldown is crucial
The game features a version of active reload. There’s no actual reloading in the game, as you’re firing lasers, but every gun can only be fired for so long before overheating and having a cooldown period. However, if you look at the bar in the middle of the screen, hitting Square/X in the yellow section as the bar decreases will instantly ready your gun for firing again. Getting the hang of this will make a big difference in intense gunfights, and allow you to nab two or three kills where otherwise you’ll only get the one.
The more consecutive reloads you make, the smaller the yellow bar gets. Again, practice makes perfect.
Use the Ion Shot on the AT-ATs
In Walker Assault, as the rebels you’ll find yourself up against it. Your job is to activate uplinks to allow air support to take down the AT-ATs shields. Once they’re down, you have a limited amount of time to do as much damage as you can. Regular lasers don’t do much damage, which is why you need the Ion Shot, which is far more effective. Players in spaceships will also do significant damage with this equipped, as will as anybody who’s managed to pick up rocket launchers and the like.
The spawn points, for now, are screwed
This is a bigger issue on Drop Zone, where the map is smaller, as enemies will randomly spawn right behind you and get an unfair kill. (They are also invulnerable for a few seconds.) It’s not uncommon to see groups of enemies spawn right in front of you, particularly in Walker Assault where you’re pushing the frontline. This is why, again, keeping an eye on the map is important, as enemies won’t pop up where you’d normally expect. Keep your wits about you.
When a pod is captured in Drop Zone, it drops goodies
Don’t run away from an escape pod as soon as it’s been captured or lost, as each pod will drop three boosters – deployable weapons, team shields, etc – after it has been claimed. As always, these boosters are first come, first serve, so sprint as fast as possible to the pod and try and get yourself a nice boost.
You keep these special perks even if you die, so try to use them at the right time.
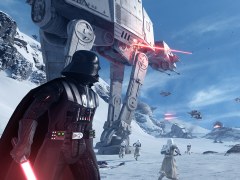
If you hear the theme music on Hoth, a hero has appeared
If you hear the iconic music of the Rebel Alliance or Imperials, then either Darth Vader or Luke Skywalker have entered the fray. A few bars of music will play to mark their appearance, and if you’re not on their side, keep an eye out for them and run like hell if they spot you.
You don’t stand a chance against a Jedi. Try to whittle down their health from distance and hope that there’s a group of you all shooting at once.
How to play as Luke Skywalker or Darth Vader in Star Wars Battlefront
Like other perks in the game, the ability to play as one of the heroes appears as a random drop which can be picked up on the battlefield. It isn’t linked to performance, so anybody can potentially become Luke or Darth.
When you do take control of one of the jedis, your health will gradually tick down, though you can still take damage and be killed. Rather than chase after the enemies and try and get kills, it’s more beneficial to head towards the objectives, with a squad of allies in tow.
Don’t forget to use your Jedi abilities on your travels: you can throw your lightsaber, which really helps cover the distance on Hoth’s huge terrain.